Saturday, December 29, 2007

Simple machines for building complex machines...

So, the holidays are past, and Merry Christmas to me, I'm now the proud owner of a Harbor Freight metal cutting bandsaw. This is a tool I've wanted for a long time, and was finally able to rationalize purchasing after a) it went on sale, and b) I agreed to coach the neighbor's son in the Robot Ramble competition for the Science Olympiad 2008.

We'll be re-using a lot of the components from some of my old battle-robots, like the motors from Centrifugal Enforcer, the batteries and ESCs from a pneumatic flipper-bot I built for Steel Conflict (but never did a build report for), and a few other gear motors, etc. I've got lying around in my stores. That said, there will be some fabrication, namely a new chassis, a lifting arm, and a gripping mechanism, all of which will require cut aluminum and steel.

I purchased the 130lbs+ beastie from my local HF warehouse, and got help from their staff loading it into the Subaru. Unloading was facilitated by a combination of gravity, a skateboard, and enough muscle power to nudge things in the right direction.

Assembly, however was going to be a different story. Step 4 in the assembly process reads "With a second person and appropriate lifting apparatus, set the saw base onto the saw stand and affix with hex bolts..." etc., etc.

Basically, the operation means setting a massive hunk of cast iron, motor, and steel, something like 95% of the weight of the tool, on top of the stamped metal "legs" that form the base.

This is one of those engineering arrangements that's strong once you have everything bolted together, but isn't conducive to supporting one corner of the machine while you lift the other bits into place. This was looking sketchy to say the least.

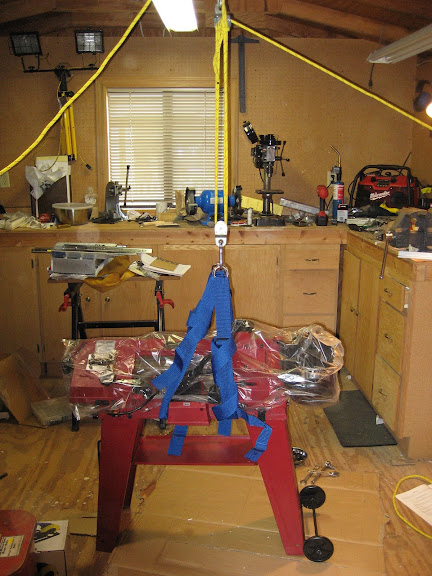
I didn't have access to a second person, but I could certainly arrange for an appropriate lifting apparatus, so after 20 or 30 minutes of scrounging in the garage and piecing things together, I'd managed some poly rope, carabiners, and pulleys. I lashed these to the joists of my workshed.

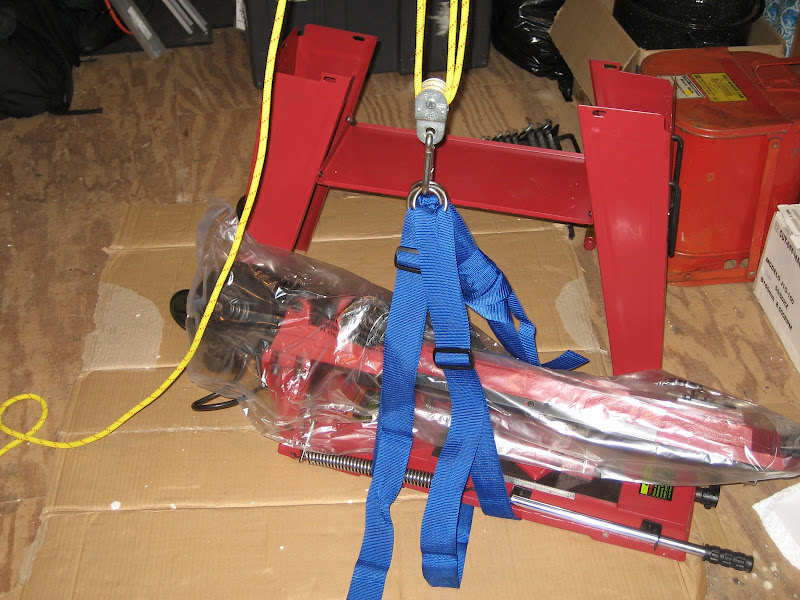
Mix in some nylon straps from the completely over-engineered hoist I'd built for the hardtop of the Miata @ my old house....

Adjusting the length of the nylon straps allowed me to compensate for the relatively ass-heavy nature of the tool. Lifting a few inches to test for balance then setting it down for adjustments took just a few tries. Eventually I was able to lift it to a working height and bring the base underneath for attachment.

After that is when the typical Harbor Freight adventure began, as the instructions were apparently for a different version of the tool. The stand that was supposed to bolt to the outside of the machine bed was clearly designed to go inside of the bed. The bolts I was instructed to fasten to "threaded holes" in the machine bed were of a barely-adequate length and the holes were not threaded (nuts supplied instead). Due to the wonder of Chinese tolerance keeping, I needed to substitute a bolt of my own as one of theirs was too short. Oh, and then there was the crusted cosmoline. A judicious application of white gas, WD-40, and an elbow-grease powered scraper cleared the beds and mating surfaces of hardened rust preventative. The best part, though, was all of the pulley-related parts I had to remove in order to install the pulley cover. (Pulleys go on last, yet came pre-installed).

In the end, though, with some care adjusting the clamps and feed adjuster, I have a functioning band saw that cuts my extruded aluminum channel very cleanly and squarely. I'll test on steel as soon as I get the chance.

Read More...

Saturday, May 19, 2007

Question of the Weekend: Why do you love cars?

So Jonny Lieberman, one of the people that exist in the form of www.jalopnik.com, is asking the important question, Why do you love cars?

This is one of those litmus test questions that determines if certain folks are the kind you can "hang with", or not. Unfortunately the answer isn't as simple as my usual friend filters: Cheesesteak: Provolone or Whiz? and Designated Hitter: Pro or Con? Get the answer to either of these questions wrong, and I just can't hang with you. Period.

I like lots of people, both Car-People and non-Car-People. But it turns out, that I don't like all Car-People, and some of them just bug the snot out of me. In my youth I would have assumed that all car-people could hang with other car-people. What experience teaches, though, is that there's a kind of formal courtesy thats extended among car-people during the "feeling out" phase that could be mistaken for genuine amity. Instead, it may be a polite acceptance of another character, possibly as tense or awkward as if you were forced to befriend someone with nearly offensive views of your religion or politics.

For example, lets assume you're in the awkward situation of escorting your spouse to a work party, and find yourself seated at a table of ten strangers. You are then introduced to another party guest with the near epithet "This is Bob from accounting, you're both Car-Guys. You should have lots to talk about". Thus begins the "feeling out" of this other Car-Guy. You'll chat about the iron you've owned and driven, and about what your current project may be, but all of this is really about finding out one critical fact about this person, the Why of his love for cars. In the end, you may have found a kindred spirit, or you may have just met another asshole who likes cars, but doesn't like them for the right reasons.

To me the funniest thing about this search for truth, is that the criteria of the Why, the meat of "whether or not I can hang with you", usually has little or nothing to do with the coarse preferences of things like "American versus Foreign", "NASCAR vs. F1", or even "DAF vs. FAF". Even as much I'd rather watch an afternoon of nearly anything instead of a NASCAR race, I'll risk cliche' and say that "some of my best friends are NASCAR fans". No, the question of Why do you love cars? is an important departure from the simpler Do you love cars?, which is all that most "outsiders" ever see of us. It answers a more deeply rooted question about someone's hopes, dreams, and sentiments.

Its about finding a linkage to a common experience, emotion, or hope. Did you grow up working on cars with your Dad? When did you hear your first V12? (Can you even remember when you heard your first V12?) Are you excited about the emerging hybrid technology trend? These are just elements in a complex equation of questions and answers. Each of these reveals a little something about yourself. While complex, this "test" has a definitive answer. In the end, we'll have found that either our paths are destined to cross at an intersection, or to run in together in a caravan.

So Why do I love cars? As we've seen, its a hard question for me to answer in a declarative way. I can offer a dozen stories from my youth that tell the sanguine tale of how I came to kneel at the altar of iron. I could wax rhapsodic about how the art and engineering of cars inspire me and demonstrate the best of what it is to be a creative human being. Instead, I think I will say that the fact that I can't answer the question directly is, in fact, the answer. So tell me your stories about your favorite cars, and maybe we can hang out. Read More...

Saturday, February 17, 2007

WBC Sidebar: LNT and Ultralight Backpacking

A couple of friends who know I'm an ex-boyscout and generally sort-of-experienced person have asked why I'm taking a course like the WBC. My answer is that after 15 years off from serious backpacking, a lot of things have changed. Gear is lighter and better, and the philosophy behind the "low impact" techniques I learned in Scouting have morphed into the "Leave No Trace" philosophy. The biggest change I can point to is that its now common practice to pack out used TP, whereas it used to be buried. On our Snow Camp trip, where the potential impact is much higher due to large numbers of students in a relatively small area, we'll even be packing out our human waste.

Another big innovation is the philosophy of "Ultralight Backpacking". In the old days 35, 40, or 50+ lbs was a normal packload for even a short trip. Using the old "25% rule", someone my size would expect a load of 50lbs. However, advancements in gear technology and a commitment by some to "do more with less" has brought about a revolution to drive down the weight of packs. Some ultralighters have a base pack weight (gear minus food, water, and fuel) down below 10 lbs! There are some interesting synergies, like a reduced pack weight lets you use lighter boots (or even trail runners) rather than the heavy 3/4-shank all-leather monsters I grew up with. This amplifies the effect of a lighter pack, allowing easier (or more) miles underfoot.

One of the things I've been experimenting with since first learning about Ultralight backpacking, is Alcohol stoves. In particular, super-lightweight stoves made from aluminum cans. The advantages are obvious upon inspection: The stoves are simple (no moving parts), compact (made from cut-down beer cans), and weigh a fraction of the weight of even the lightweight backpacking stoves of commercial manufacture. Compared to my old MSR Whisperlite, the difference is amazing.


I used Mark Jurey's Penny Stove example when creating my first stove. I'm sure I'll try another at some point, but for now I'm really happy with the results. This particular stove uses a pair of the Heineken "Keg Cans" for the burner and fuel cups, and a soda can (diet 7-up for those keeping score) for the base/lid. And of course, the namesake penny as the regulator. The stove actually develops a small amount of pressure as the denatured alcohol fuel is vaporized in the cup. The weight of the penny over the central holes is enough to keep the pressure at a good level but allow venting (and an extra central jet) when the pressure gets too high. A "simmer ring" (see bottom of picture below) redirects the jets and slows the evaporation of the fuel, allowing a longer/cooler burn time for simmering food. The design genius in its simplicity. I had some trouble with sealing the construction of mine so I went ahead and "caulked" the cups together with JB weld, but most folks get a pressure-tight fit from interference alone. Impressive!

I've also upgraded to a 1.3L Snow Peak titanium cookpot to replace the old stainless pot seen here. Its lighter, despite the greater capacity, and should be a bit more efficient too since its black rather than the reflective exterior. The important metric of this experiment is the weight of the whole cooking "system", as there's more to consider than just the stove. The one disadvantage to alcohol over white gas or pressurized liquid fuel canisters is that alcohol burns at a lower temperature and has a lower overall energy density, meaning that you have to carry more fuel per meal. On the other hand, the denatured alcohol fuel can be carried in a lightweight plastic water bottle or other such vessel (I use a flat-square soap bottle that fits my cookpot well), while white gas has to be carried in a spun aluminum bottle with a gasket and pressurized fuels have their own disposable metal canisters. The massive weight savings of the stove itself, along with the fuel bottles and ancillary bits means that I'd have to be going on a pretty long trip (5+ days?) before the fuel weight difference would overtake and make a white gas stove a lighter alternative.

One of the things I was using the Car-Camp outing for was to try some new gear and new techniques. It was a good chance to try some stuff without having a failure be totally catastrophic. A new lunch system was tried with great success, and I had mixed feelings about the new sleeping bag and tent I'd rented from REI. All of these experiences get fed-back into my gear for the next outing. I'll use the next outing to evaluate my new cooking system in the same way, although backyard tests have shown that the time-to-boil for two cups of water is only about a minute longer than with white gas. Read More...

WBC Outing 3: Hawk Canyon and Borrego Mountain

OK, the next installment of my mad flurry to update on my WBC activities.

Our first overnight outing for the WBC was a car camp to Hawk Canyon and the Borrego Mountain/West Butte area. The trip description called for some time on an unimproved road, so I wussed out and carpooled with the trip's excellent leader Bev. Turns out, she was driving an Outback, so the WRX would probably have been just fine. I'm now taking steps to prep my scoobie for more time on trail head roads like these. (I'll raise the suspension a bit, and fit fore and aft skid plates when I can afford them.)

We'd barely made it to the campsite when things got exciting: A few of our group drove cars even less-suited to the roads than the WRX, (an Avalon and a Jetta), and before we'd even setup camp, we had to dig and push the two of them out of the silty sugar-soft sand of the wash. Lesson learned: If/When I bring the scoobie, I'll be packing a full size shovel, some carpet squares, and a couple of boards.

After setting up a quick car camp, we discussed the impending weather (rain was possibly in the forecast) and decided to reverse the day's destinations. So we set off on foot for "The Slot", a collection of deep crevasses carved by water into the soft earth. This was a really beautiful area, well shaded and an incredible geological record. Its also clearly part of a living ecosystem, as we found scat, evidence of nests, and even the remains of animals that had been prey to small predators. After hiking down The Slot, I was glad we'd switched Saturday and Sunday's destinations, as this was no place to be after even the slightest amount of rain!

I experimented with a new lunch system down here in the slot, with great results. A basic lunch consists of a foil pouch or tuna (or two, depending on package size), combined with condiment packets of mayonnaise and dijon mustard boosted from my work cafeteria. Mix ingredients and apply into a pita, and its a very tasty no-cook trail side meal. The part I'm really happy about is that with whole-wheat pita and fish packed in light oil, I've got a really great combination of carbohydrates and protein to keep myself powered up for the hike. (A hard day's backpack will burn upwards of 4000 calories, this is not the time to be dieting lest you "bonk" in a really dangerous spot.) I'll be packing similar lunches on my next couple of outings, as I'm really happy with the weight-to-calories and the low weight and bulk of the leftover packaging that gets packed out.

After the hike was a car-camp only experience: gourmet hors d’oeuvres and smores! (Potluck style!). I panicked when the trip sheet called for "heavy hors d'oeuvres", so when asked, I punted and said "Fondue". It turns out this really raised the bar for everyone else, so the net experience was too much food, and all of it delicious! For certain friends in-the-know, this analogy will have meaning: Imagine an E-party in the clear desert night air! (For everyone who doesn't get this, I pity you.)

After a windy night, Sunday morning brought the desert beauty I've come to love. I spent the first hour or so after rising exploring Hawk Canyon on my own, and experimenting with various color and ISO settings on my digicam to try to capture the morning light. It never got really cold, but I was glad to have my fleece while leaning on a rock with my mini-tripod trying to setup these shots!

I'm also still working on my self-photography technique, trying to capture myself in as candid a way possible when shooting with a camera 3" off the ground! The lesson learned on this day was: Comb your hair! I made a joke to one of my trip mates that I needed photo evidence for my wife that I really didn't spend the weekend at the tables in Vegas!

Day two also brought another cool hike to the top of Borrego Mountain. This isn't a huge climb, but the valley does drop away from the peak on the north side, so it makes for some cool views from the top. We explored the ridgeline and did some hiking on surfaces that don't show trails well, so we were guided by rock pile Cairns (which the Sierra Club folks call "ducks"). The wind had been blowing on the way up, but after a stop near the peak for lunch, the gusts started to pick up, and I noticed that the weather was finally threatening to make it over the mountains to the northwest. What had been fluffy clouds meandering across the afternoon sky were starting to become darker, denser, and faster moving. I pointed this out to Carol, who was leading this particular hike, and the decision was made to boogie back down the mountain. Going downhill is always faster, but I felt a certain sense of urgency too in the decent. By the time we'd neared the cars, the gusts were close to 40 or 50mph (enough to knock me off balance a couple of times, even with trekking poles). After reaching the cars, saying our goodbyes, then negotiating the dirt roads back to the highway, we got about 15 more minutes before the rain hit, and it hit fairly hard. The timing was good, I'd hate to have been up on that ridge in the wind and wet...

All in all, a really fantastic trip. I can't wait for the Land-Navigation trip next weekend.
As usual, my complete trip gallery can be found here. Read More...

WBC Outings 1 and 2: Cowles Mountain

OK, OK, I'm late. I know. I'd intended to be blogging this stuff sort of "as it happened", but it turns out the tools to make the blogging easy are at home, and the time I have to blog is the stolen lunch hour at work... Sue me.

Anyhow, here's the first in a slew of entries to catch up on my activities with the Sierra Club Wilderness Basics Course (hereafter known as WBC) .

Since I grew up in the area, and went to PHHS, in it the shadow of Cowles Mountain, I'm fairly familiar with the WBC's first outing location. Cowles Mountain is probably the most popular hiking trail in the county, likely due to its location and elevation change rather than the interesting (or rather uninteresting) nature of the trail and its views.

The WBC use it as a good conditioning hike and as a method to gauge individual fitness levels for the participants. Its classed as a M3B hike using the Sierra Club Classification (Moderate, 3 Miles, 500-1000 feet of Elevation Change), and is a good yardstick against which to measure later hikes. In fact, the elevation delta is almost exactly 1000 feet from the trail base, so its easy to "guess" how you'd feel on a long M6C, which would be roughly equivalent to climbing Cowles twice. My time? Slower than average, but I think it reflects that I'm a slow climber: 42 minutes for the ascent. (36 was average). One experienced gentleman smoked me with a time of 26 minutes... yeowch.

We were required to do it once on either weekend, I chose to do it both times since I was breaking in a new pair of Lowa Trekkers (stiff all-leather), and I need the conditioning after taking so long off from jogging. Just look at that beer gut!

Click here to view my whole album for those hikes. I'll be doing similar albums for each trip as I post the reports here! Read More...

Thursday, February 01, 2007

Hack of the Day: Mini-Hacks!

I stumbled across a pair of nice little tips today, and I love doing my Hack of the Day topics, so here's a tidy collection of random tips that jut might hack your life for the better:

I love Firefox. I love tabbed browsing. I love one-click closing of tabs. But sometimes, due to my own fumble-fingeredness, I miss-click or over-click. Problem solved:

Firefox Tip: Reopen the last closed tab with Ctrl+Shift+T - Lifehacker


Secondly, my memory is pretty good, and most folks loathe playing trivia type games with me, since my noggin is full to leaking with ephemera and minutia. But for the life of me, for inexplicable reasons, I have problems remembering something that others find basic: How many days in the month of March? Or April? Well Lifehacker rescues me again with their MacGyver Tip today:

Use your knuckles to remember each month's days.

I love it, especially because its physical, usually once I've pantomimed or otherwise made handsigns for a memory aid a couple of times, it sticks with me. Stuff like the Left Hand Rule for current and magnetic flux tends to stick pretty well. Here's hoping the days in a month do too! Read More...

Thursday, January 25, 2007

Hack of the Day: Magnetic Spice Rack

Came across this the other day, and it reminded me that I never blogged on my own solution to the "problem" of kitchen spice management.

My Aim Is True: DIY: Magnetic Spice Rack

When it came time to setup the kitchen in our new house, I wanted my spices to be better organized and more accessable than they'd been at the old place. Being a die hard Alton Brown and Good Eats fan, it was a natural that I chose an in-cabinet solution, to offer better visability to my collection (versus the 5-rows deep of spice containers in a high cabinet that many folks have). It also keeps the spices out of the sun, away from damaging heat and most importantly, doesn't burn counter space.
Here's my solution, which is similarly magnetic:


I went magnetic because we found a great deal on a spice kit similar to this one on clearance at Sears. The shakers already had magnets on the back and have two "cutouts" around the rim that allow either light or heavy spice shaking without having to remove the lids. The plates are Ikea "BAR" message boards, a whopping $0.99 each. Note that I've combined two different kits worth of spice shakers here... I have a lot of spices.


I like the inventiveness of Amber's project, but the aforementioned heat and light are big issues when it comes to the useful life of spices. If you're starting with plain watchmakers cases like Amber did, you could either go magnetic or make like Alton Brown himself and just use self-adhesive Velcro strips. However I've seen lots of knock-offs of the magnetic tins at places like Lowes, Sears, etc. and they're a lot cheaper than the Amazon example, so you might actually save money not doing everything from scratch.

EDIT: OK, a tipster in another thread pointed to these at Sciplus, which is pretty damn cheap for a similar solution. In this case, gluing your own magnets or velcro will almost certainly be cheaper. Man, I haven't been to Sciplus in months. Need to start checking back there on a regular basis.


Read More...

Tuesday, January 23, 2007

Hack of the Day: Microwave your Kitchen Sponge

Like a lot of people, we use kitchen sponges at home for washing pots, scrubbing the stuff stuck on plates before the dishwasher, etc. And like a lot of people, we worry about what's actually living in the cells of those little cellulose critter catchers...

We change sponges regularly out of these concerns, but the reality is that the sponges are probably just as nasty on Day 2 as they are on the day we throw them out. Thus, I love the simplicity (and the chance to prolong sponge life and reduce waste) of this idea from LiveScience:

LiveScience.com - Study: Microwaves Kill Kitchen Germs

OK, the title of the article is a little misleading, its not microwaves that do the killing, per se. The reality seems to be that the heat generated by microwaving a wet kitchen sponge is enough to sterilize it. They recommend 4 minutes to ensure death to even the nastiest, hardest to kill spores. I can say that based on my experience with modern microwaves, 4 minutes on "High" for the amount of water in a normal kitchen sponge is definitely enough to superheat the water (i.e. raise it beyond the normal boiling temperature), which will certainly get it well into critter killing temperatures.

WARNING: Be extremely careful removing the newly nuked sponge from your 'wave. It will be hot, Hot, Hot!

NEW WARNING:
Apparently some people didn't twig to the fact that its hot water that does the sanitizing and there were a rash of fires and problems with people microwaving dry sponges. YOU MUST WET THE SPONGE!

Personally, I plan to use a small microwave safe dish for this, since then I can nuke the sponge after the morning breakfast cleanup, set it on the counter, and let it cool back to sub-plasma temperatures while I head to work.
Read More...

Friday, January 19, 2007

"Shaun of the Dead" team returns...

OK, I can't wait to see this one. Simon Pegg and Edgar Wright, the writing team behind Shaun of the Dead, the greatest "Romantic Comedy. With Zombies" movie ever filmed, have returned with Hot Fuzz, which looks to be a similar treatment of the "cop movie" genre that SotD received via the horror genre.

As the Times Online points out, the cast reads like a who's-who of Brit actors, most of whom, like Bill Nighy and Martin Freeman, have already proven their comedy chops. I couldn't get SotD into my collection fast enough when it hit DVD, and I'm sure the same will be true here.

I think maybe we need either a Shaun or generic cop movie themed DVD party at my place when this thing lands stateside!

The Times article is mostly spoiler free, but avoid the last paragraph if you want to completely avoid anything remotely spoiler-like:
Hot Fuzz - First night reviews - Times Online Read More...

Thursday, January 18, 2007

We're Getting It: BMW 135i Coming to US - Jalopnik

We're Getting It: BMW 135i Coming to US - Jalopnik

Hooray!!!

During our trip to Germany last summer, this was one of my favorite "foreign" cars we'd spotted. (I was also a big fan of the various Smart offerings, especially the Smart Roadster, Kim liked the Smart ForTwo).

I have to say that, up-close, the Bangle "Flame Edge" treatment actually seems to work on the scale of the 1-series cars. (In the same way that it "sort of works" on the Z4 coupe.) The cars very purposeful looking, and have a similar "hunkered down" look as my E36/8 Z3 Coupe (although not as extreme).

Hopefully, the modern suspension design will allow them to comport themselves in a more "gentlemanly" manner, as my E36/8 is a handful. Definitely not a "beginners" car. She'll hang the tail on a whim and leave it hanging "'till you run out of petrol" as Jeremy Clarkson once said of the car on Top Gear.

The 135 (with the biturbo mill from the new 335 coupe) makes me think that maximum hoonage is likely to ensue. (Big power, low weight, and RWD is a recipe for hoonage if there ever was one).

For now, us 'mericans can sate our taste for Bavarian tail hanging with this little diddy courtesy of Google Videos. Read More...

Friday, January 12, 2007

Gettin' Outside

Long ago I was a Boy Scout. My close friends know this, not because I speak often of my time in the scouts, but because parts of the social conditioning they imprinted on me stuck so successfully. Like it or not, the "Be Prepared" ethos is carved onto my soul, and while I sometimes don't work hard enough at being obedient, thrifty, or reverent, most of the other conditioning has stuck too. Its amazing to me that an organization that I feel so conflicted about (and ultimately felt compelled to leave, over organizational politics), had such a strong impact on me that in most things would probably be considered positive.

Well, BSA Motto, Law, and Slogan aside, my time in the scouts left me with one other itch I haven't scratched in quite a while, and that's a love of the outdoors. Between family trips and scouting, I spent a good chunk of my youth outdoors. That practice ended unexpectedly suddenly with college, when time and sleep became precious commodities. I've dragged my wife out on a few outings since then, and even done a couple of (perhaps ill-advised) solo trips.

I like the freedom of a solo hike, but that "Be Prepared" mantra as well as a healthy respect for Murphy and Mother Nature make me a bit anxious when off by myself. So while searching Craigslist for a hiking partner, I found instead the Sierra Club Wilderness Basics Course. I'm pretty excited, as the course consists of weekly classes and biweekly outings including hiking, car camping, backpacking, and snow camping.

Now I'm sure the weekly lectures will be largely review, but then again I can use the review. I'm also hoping that at the end of the course I've gained either some new potential hiking partners, or at least the confidence and knowledge to tackle additional solo trips with less risk.

In any case, I'm sure I'll be commenting on this experience more, and offering my review as it unfolds, but for anyone looking for a way to get outdoors that provides some structure and oversight, this looks like a great way to get it! (My class starts January 18, so sign up and join me if you can!) Read More...

Thursday, January 11, 2007

Clear as a Bel...Canto

So a while back I saw this post on Lifehacker on the easy way to digitize audio cassettes. Now as far as purchased music is concerned, I'd rather just re-buy the choice stuff, and forget the dated clinkers of my youth. However, I do have a bunch of cassettes that are worth the effort, and this week I got just the kick in the pants I needed to spend some time on it. I caught wind of an informal reunion of the Patrick Henry Bel Canto Singers. (Long story short - A competitive vocal group I was proud to sing in from 1990 to 1993) In the family collection is a set of concert tapes from the years my younger sister and I were in the group (spanning to 1995!). Some of my happiest memories from high school (and indeed my whole life) came while singing in this group, so these are definitely tapes worth saving. So I dug out the box containing my ancient Tascam Portastudio (overkill, but the only cassette player I still own with a decent transport mechanism) and lined it into my PC, pretty much following the Lifehacker instructions. Having a real 4-track, even a 13 year old low-budget one, was much easier to deal with than I imagine a walkman would have been, since at least I had dedicated slider pots for the channels and master, and could control the mix a little... As I'd feared when I first started thinking about this project, the magnetic media is already pretty degraded. That, coupled with the low-budget nature of our production (public school music program anyone?) and the less than ideal mic and production setup from the guy who sold the tapes, made for a pretty ugly audio canvas... ... but at least now I've started the process of archiving this stuff permanently. I managed to get two concerts recorded and cut into tracks tonight, and I'm hoping to have most of the collection done before the reunion, as some CDs loaded with our exploits will make excellent party favors. I really like the Audacity package recommended by Lifehacker. After spending some time in real studios where the "low end" software is something like ProTools, this is pretty limited, but for what I'm doing, and given the price ($0), I'm very happy! Here's a couple of the tracks that resulted: (big files, but worth the download if you're a music lover) Exultate Love Walked In Read More...