I've been spending an inordinate amount of time thinking and talking about food lately. Mostly amongst foodie friends and family, but also with non-foodie friends as I try to once-again emphasize Moderation in my eating habits. More importantly, I'm hoping to strike a balance between eating-what-I-want and not-eating-too-much. Since the majority of my readers are friends, family, or people who care about the latest camper project or robot hack, and the minority are foodies, I'll be taking the food stuff over to a different blog: Herbie Eats...
It'll be strictly food-centric, a mix of my fun eating experiences, amateur reviews, recipes, and any thoughts I have as I try to reduce the quantity of what I eat while maintaining (and improving) the quality. Hope you'll follow me there!
Read More...
Showing posts with label Food. Show all posts
Showing posts with label Food. Show all posts
Friday, April 20, 2012


Sunday, April 20, 2008
Low Budget Wine Cellar from Refrigerator
'Round my house, we love wine. A lot.
At one point we had so much wine in the house that in order to keep track, I wrote an Access database program I dubbed "Wine Collector" (in homage to my favorite DVD database product Movie Collector).
We aren't really snobs, we'll drink a big range of stuff, but some of the wine we have is pretty good, and we'd like to keep it that way. Unfortunately, commercial wine cellars (aka "wine coolers" or "wine fridges") are pretty expensive, especially if they hold any reasonable amount of wine. The smaller units are typically underpowered vanity items that only store one or two dozen bottles, and usually don't do it very efficiently. There are some exceptions of course, high quality under-counter jobbies made by reputable companies with quality refrigeration hardware, but these are nearly as expensive as the larger models of any measurable quality.
So what to do? Well, for us we did what a lot of people do, which is that we put our wine at risk. We stored it in the house, at room temperature and uncontrolled humidity. Where possible, we squirreled cases away in the tops of closets, etc., but generally, it was somewhere in the house. I don't even want to think about what this may have done to something like a 2001 El Molino Pinot Noir.
Then, I stumbled across some wine collector websites where some people had been converting old fridges to wine cellars. Either by hacking the existing thermostat, or using some sort of external controller, the unit can be setup to hold a temperature more appropriate for wine (about 54° for mixed reds/whites).
Luckily, I already had an unused fridge to start with. When we moved to our new home, we brought along our old refrigerator. The buyer of the old house didn't want it, and my wife really wanted to keep it because she liked the bottom-freezer layout. After arriving, however, we figured out that the proximity of the kitchen cabinets opposite the fridge location meant that we'd be limited to side-by-side configurations, because the sweep of the doors would interfere with the cabinet. Bummer. So that fridge sat in the garage, waiting for me to clean it up and sell it or convert it to the "beer fridge". Well, now it had a more noble (and wife approved) mission ahead of it: Wine Cellar.
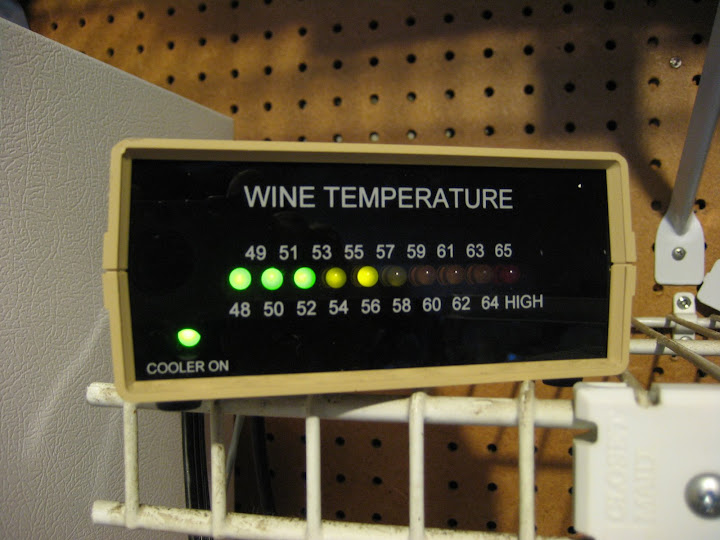 With some poking around looking for an appropriate thermostat unit, I stumbled across and older model WineStat unit on eBay, and it was mine for an uncontested $10 bid. I'm not sure how much this model was originally, but the new digital display models are $170, so I think I did ok!
After cleaning up and sterilizing the inside of the fridge (it sat for almost two years!), all I needed to complete the transformation was a way to store wine inside.
The WineStat webpage has some interesting ideas about low-cost wine racking solutions, but I chose to go with the very reconfigurable "Tinker-Toy" style racks from J.K. Adams. As it happened, Crate and Barrel had these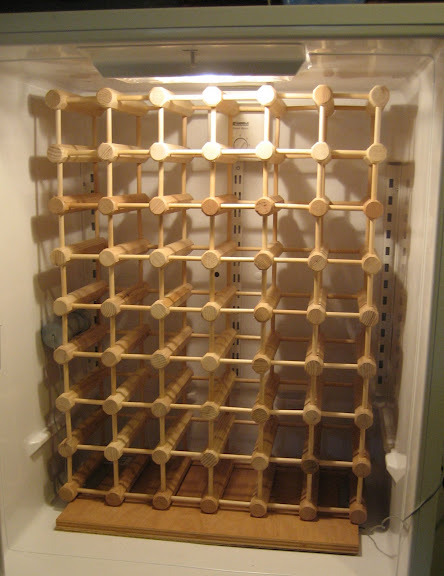 in their outlet store as "irregulars" for $19.95 for each 12-bottle kit. In this case, "irregular" meant inconsistent woodgrain color, which I was completely fine with. A "12-bottle" kit really means you get 16 "beams" and a whole pile of pins to configure however you please. With four of these kits (less one leftover beam and a few pins) I was able to build a solid 48 bottle unit that fit perfectly with room for air to circulate.
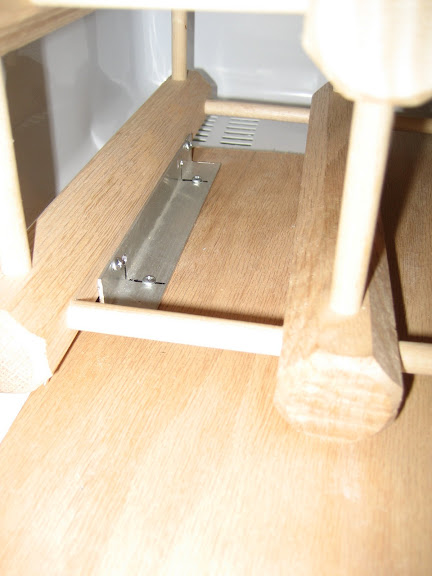 The wooden platform underneath was a leftover bit of oak cabinetry ply that flattens out the floor of the fridge box so the rack sits level. I had to cut a notch in the back left corner to clear the raised vent where cool air flows from the freezer to the fridge. A couple of quick mounting brackets made from aluminum keeps everything locked down and stable:
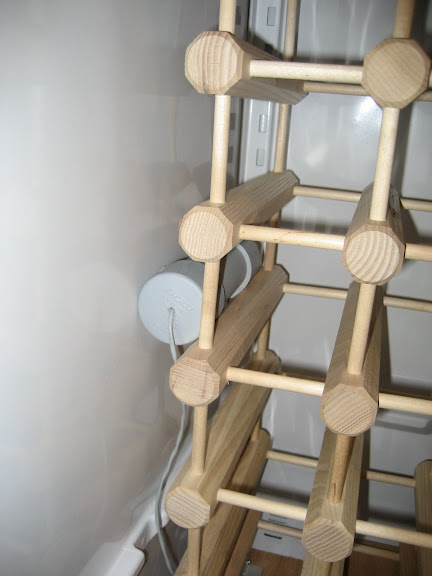 Then its just a matter of inserting the probe into the rack and plugging everything in. The probe should be centered in the box, its off to the side here while I finalized installation.
Most people don't realize that modern refrigerators depend on the thermal mass inside to help regulate the temperature. I tested the setup with several gallons of water in containers in the fridge and freezer boxes first. Once I was confident it would hold temperature, in went the wine rack, and shortly after, the wine!
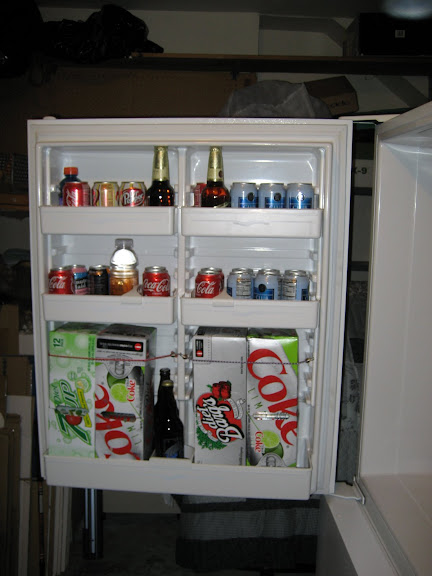 Agitation is bad for wine, so I resisted the urge to pack in more bottles using the spaces in the door. Instead, I filled this area with the soda, beer, and other beverages that would have otherwise been stored in the pantry. Its not ice-cold refreshing, but its pre-chilled which saves work for the in-house fridge when items are transferred there for consumption.
Your fridge may vary, but during my bottles-of-water testing I found that in order to keep the fridge box at a wine-friendly 55°, the freezer box ended up cycling around 30-32°. This is below freezing, but not in a zone that I feel is safe for frozen food storage.
In order to turn this into a win-win-win situation, I'm keeping the freezer box filled with gallon bottles of commercial drinking water in PET containers (with room made for freezing expansion). This constitutes part of my backup water supply in case of emergency (my wife lived through the Northridge quake and we've been on evacuation notice for wildfires here twice in the last 4 years). Having additional ice on hand will also allow me to transfer to the in-house freezer to keep frozen food safe longer if we lose power during an emergency. Lastly, the frozen mass of water helps stabilize the box temperature as the thermostat controller goes through its hysteresis, which also lets the box stay "off" longer, using less power.
The only issue left to be resolved is humidity. 60-70% would be best for keeping the corks happy, but food fridges are usually pretty dry. For now I'll probably keep a small tin of water in the box, but I plan on investigating the humidifier units people use for large cigar humidors.
All up, I've expended less than a $100 cash and a few hours time to clean up the old fridge, assemble the tinker toys, and mount and test the system. More pictures with detail photos of some items are available in the album: Low-Budget Wine Cellar.
(04/21/08)UPDATE: I've added new photos to the album. You can see that our cellar is already full. Time to have a party! Read More...
At one point we had so much wine in the house that in order to keep track, I wrote an Access database program I dubbed "Wine Collector" (in homage to my favorite DVD database product Movie Collector).
We aren't really snobs, we'll drink a big range of stuff, but some of the wine we have is pretty good, and we'd like to keep it that way. Unfortunately, commercial wine cellars (aka "wine coolers" or "wine fridges") are pretty expensive, especially if they hold any reasonable amount of wine. The smaller units are typically underpowered vanity items that only store one or two dozen bottles, and usually don't do it very efficiently. There are some exceptions of course, high quality under-counter jobbies made by reputable companies with quality refrigeration hardware, but these are nearly as expensive as the larger models of any measurable quality.
So what to do? Well, for us we did what a lot of people do, which is that we put our wine at risk. We stored it in the house, at room temperature and uncontrolled humidity. Where possible, we squirreled cases away in the tops of closets, etc., but generally, it was somewhere in the house. I don't even want to think about what this may have done to something like a 2001 El Molino Pinot Noir.
Then, I stumbled across some wine collector websites where some people had been converting old fridges to wine cellars. Either by hacking the existing thermostat, or using some sort of external controller, the unit can be setup to hold a temperature more appropriate for wine (about 54° for mixed reds/whites).
Luckily, I already had an unused fridge to start with. When we moved to our new home, we brought along our old refrigerator. The buyer of the old house didn't want it, and my wife really wanted to keep it because she liked the bottom-freezer layout. After arriving, however, we figured out that the proximity of the kitchen cabinets opposite the fridge location meant that we'd be limited to side-by-side configurations, because the sweep of the doors would interfere with the cabinet. Bummer. So that fridge sat in the garage, waiting for me to clean it up and sell it or convert it to the "beer fridge". Well, now it had a more noble (and wife approved) mission ahead of it: Wine Cellar.
With some poking around looking for an appropriate thermostat unit, I stumbled across and older model WineStat unit on eBay, and it was mine for an uncontested $10 bid. I'm not sure how much this model was originally, but the new digital display models are $170, so I think I did ok!After cleaning up and sterilizing the inside of the fridge (it sat for almost two years!), all I needed to complete the transformation was a way to store wine inside.
The WineStat webpage has some interesting ideas about low-cost wine racking solutions, but I chose to go with the very reconfigurable "Tinker-Toy" style racks from J.K. Adams. As it happened, Crate and Barrel had these
in their outlet store as "irregulars" for $19.95 for each 12-bottle kit. In this case, "irregular" meant inconsistent woodgrain color, which I was completely fine with. A "12-bottle" kit really means you get 16 "beams" and a whole pile of pins to configure however you please. With four of these kits (less one leftover beam and a few pins) I was able to build a solid 48 bottle unit that fit perfectly with room for air to circulate.The wooden platform underneath was a leftover bit of oak cabinetry ply that flattens out the floor of the fridge box so the rack sits level. I had to cut a notch in the back left corner to clear the raised vent where cool air flows from the freezer to the fridge. A couple of quick mounting brackets made from aluminum keeps everything locked down and stable:Then its just a matter of inserting the probe into the rack and plugging everything in. The probe should be centered in the box, its off to the side here while I finalized installation.Most people don't realize that modern refrigerators depend on the thermal mass inside to help regulate the temperature. I tested the setup with several gallons of water in containers in the fridge and freezer boxes first. Once I was confident it would hold temperature, in went the wine rack, and shortly after, the wine!
Agitation is bad for wine, so I resisted the urge to pack in more bottles using the spaces in the door. Instead, I filled this area with the soda, beer, and other beverages that would have otherwise been stored in the pantry. Its not ice-cold refreshing, but its pre-chilled which saves work for the in-house fridge when items are transferred there for consumption.Your fridge may vary, but during my bottles-of-water testing I found that in order to keep the fridge box at a wine-friendly 55°, the freezer box ended up cycling around 30-32°. This is below freezing, but not in a zone that I feel is safe for frozen food storage.
In order to turn this into a win-win-win situation, I'm keeping the freezer box filled with gallon bottles of commercial drinking water in PET containers (with room made for freezing expansion). This constitutes part of my backup water supply in case of emergency (my wife lived through the Northridge quake and we've been on evacuation notice for wildfires here twice in the last 4 years). Having additional ice on hand will also allow me to transfer to the in-house freezer to keep frozen food safe longer if we lose power during an emergency. Lastly, the frozen mass of water helps stabilize the box temperature as the thermostat controller goes through its hysteresis, which also lets the box stay "off" longer, using less power.
The only issue left to be resolved is humidity. 60-70% would be best for keeping the corks happy, but food fridges are usually pretty dry. For now I'll probably keep a small tin of water in the box, but I plan on investigating the humidifier units people use for large cigar humidors.
(04/21/08)UPDATE: I've added new photos to the album. You can see that our cellar is already full. Time to have a party! Read More...
Thursday, January 25, 2007
Hack of the Day: Magnetic Spice Rack
Came across this the other day, and it reminded me that I never blogged on my own solution to the "problem" of kitchen spice management.
My Aim Is True: DIY: Magnetic Spice Rack
When it came time to setup the kitchen in our new house, I wanted my spices to be better organized and more accessable than they'd been at the old place. Being a die hard Alton Brown and Good Eats fan, it was a natural that I chose an in-cabinet solution, to offer better visability to my collection (versus the 5-rows deep of spice containers in a high cabinet that many folks have). It also keeps the spices out of the sun, away from damaging heat and most importantly, doesn't burn counter space.
Here's my solution, which is similarly magnetic:

I went magnetic because we found a great deal on a spice kit similar to this one on clearance at Sears. The shakers already had magnets on the back and have two "cutouts" around the rim that allow either light or heavy spice shaking without having to remove the lids. The plates are Ikea "BAR" message boards, a whopping $0.99 each. Note that I've combined two different kits worth of spice shakers here... I have a lot of spices.
I like the inventiveness of Amber's project, but the aforementioned heat and light are big issues when it comes to the useful life of spices. If you're starting with plain watchmakers cases like Amber did, you could either go magnetic or make like Alton Brown himself and just use self-adhesive Velcro strips. However I've seen lots of knock-offs of the magnetic tins at places like Lowes, Sears, etc. and they're a lot cheaper than the Amazon example, so you might actually save money not doing everything from scratch.
EDIT: OK, a tipster in another thread pointed to these at Sciplus, which is pretty damn cheap for a similar solution. In this case, gluing your own magnets or velcro will almost certainly be cheaper. Man, I haven't been to Sciplus in months. Need to start checking back there on a regular basis.
Read More...
My Aim Is True: DIY: Magnetic Spice Rack
When it came time to setup the kitchen in our new house, I wanted my spices to be better organized and more accessable than they'd been at the old place. Being a die hard Alton Brown and Good Eats fan, it was a natural that I chose an in-cabinet solution, to offer better visability to my collection (versus the 5-rows deep of spice containers in a high cabinet that many folks have). It also keeps the spices out of the sun, away from damaging heat and most importantly, doesn't burn counter space.
Here's my solution, which is similarly magnetic:
I went magnetic because we found a great deal on a spice kit similar to this one on clearance at Sears. The shakers already had magnets on the back and have two "cutouts" around the rim that allow either light or heavy spice shaking without having to remove the lids. The plates are Ikea "BAR" message boards, a whopping $0.99 each. Note that I've combined two different kits worth of spice shakers here... I have a lot of spices.
I like the inventiveness of Amber's project, but the aforementioned heat and light are big issues when it comes to the useful life of spices. If you're starting with plain watchmakers cases like Amber did, you could either go magnetic or make like Alton Brown himself and just use self-adhesive Velcro strips. However I've seen lots of knock-offs of the magnetic tins at places like Lowes, Sears, etc. and they're a lot cheaper than the Amazon example, so you might actually save money not doing everything from scratch.
EDIT: OK, a tipster in another thread pointed to these at Sciplus, which is pretty damn cheap for a similar solution. In this case, gluing your own magnets or velcro will almost certainly be cheaper. Man, I haven't been to Sciplus in months. Need to start checking back there on a regular basis.
Read More...
Monday, September 26, 2005
The Foodie goes on a Diet...
So about two weeks ago, I started seeing a weight-management physician to help get me back on track with a self-guided weightloss plan I started about 18 months ago. I lost ~25lbs on my own, and then plateaued off, so I got some professional advice. Dr. Lee recommended 1800-2000 calories per day.
Naturally, as a food-nut, this is the sort of thing that hits me where I live, and my friends are all aware of my current plight, especially when they see me counting calories at a beer-tasting festival.
One such friend just sent me a link to this Slashfood Interview, about an all-pizza diet, and asked if I thought I could do it. My response was "Probably Not", but I did find a couple things in the interview that resonated, so I added that to my response to him, and it devolved into a menu just ripe for blogging:
Welcome to my life right now... Frequently hungry, and rigidly trying to control portions.
I'm saving a lot of money because I'm making my own sandwiches in the morning, mainly to enforce portion control. (Can't count on the work cafeteria, etc.) It has actually been pretty good because with weekly trips to the Farmer's market, they basically become gourmet sandwiches. "Splurging" on good ingredients and indulging in tasty condiments has helped quite a bit. Here's a typical week of lunches:
Monday: Southwest Turkey Sub, approx. 580 calories
6" of Bread & Cie Baguette, 2oz Peppered Turkey Breast (Deli Sliced), 2oz Swiss Cheese, 1/2cup Roasted Bell Pepper (bottled), 1 slice red onion, 1 tbsp Homemade Light Chipotle-Ranch Dressing (1 canned chipotle in ~1/2C Light Ranch Dressing, blended until smooth, leftover from a southwest style dinner salad Kim made...)
Tuesday: Ham & Cheese, Deutschland Style, approx. 600 calories
2 thin slices of Bread & Cie crusty loaf (Rosemary or Garlic/Goat, etc.), 2oz Black Forest Ham (Deli Sliced), 2oz Swiss Cheese, 1 leaf lettuce, 2 tbsp stoneground dijon mustard
Wednesday: Salami & Cheese, French Style, approx. 600 calories
6" of Bread & Cie Baguette, 2oz Dry Cotto Salami (I would have used Garlic Sausage if I could get it), 2oz Swiss Cheese, 1 leaf lettuce, 1/4 Heirloom tomato, 1 slice red onion, 1 tbsp brown mustard
Thursday: Ham & Cheese, French Style, approx 600 calories
6" of Bread & Cie Baguette, 2oz Black Forest Ham (Deli Sliced), 2oz Swiss Cheese, 1 leaf lettuce, 1 slice red onion, 1/4 Heirloom tomato, 1 tbsp Newman's Own Light Balsamic Vinegrette dressing
Friday: Mediterranian Turkey Sub, approx. 580 calories
Basically the same as the southwest sub, but substitute Vinegrette for the Chipotle Ranch, and add Heirloom tomato slices and a basil leaf or two...
Its been fun playing with a basic sandwich structure and varying just a couple of ingredients like dressings or the meat to see the different combos I can come up with. I've tried to take a few tips from Alton Brown's Good Eats "Sandwich Craft" episode as far as construction and wrapping to blend flavors and keep things together.
Having Swedish/German roots also means you always have 13 kinds of imported mustard in the house (I get this stuff in my Christmas stocking - Literally), and that helps. So far I haven't gotten bored. (2+ weeks into it)
Add these lunches to a 100 calorie prescription breakfast shake, and that leaves me a decent number of calories for afternoon snacks (also prescription) and/or a decent dinner. (1800 to 2000 calorie/day target, right now)
Dinners have gone well too. You figure out pretty quickly that herbs are basically free, and most veggies are nearly free. It also helps having to cook for a vegetarian, there's less temptation to stray too far into the more calorie-heavy meat dishes, etc.
My next weigh-in is in a couple of weeks. I'm optimistic. Read More...
Naturally, as a food-nut, this is the sort of thing that hits me where I live, and my friends are all aware of my current plight, especially when they see me counting calories at a beer-tasting festival.
One such friend just sent me a link to this Slashfood Interview, about an all-pizza diet, and asked if I thought I could do it. My response was "Probably Not", but I did find a couple things in the interview that resonated, so I added that to my response to him, and it devolved into a menu just ripe for blogging:
Slashfood: Why do you think you lost weight on the diet? Was it because it forced you to be creative? Portions? Sullivan Street no-cheese Pomodoro?
VC: Pure portion control. I was just determined not to pig out. I went around hungry most of the time, actually... which is really strange for me. I'm a huge foodie and love love love to eat. I just had a good sense of appropriate portions and forced that on myself. I didn't want to lose $200 (the bet)...
Welcome to my life right now... Frequently hungry, and rigidly trying to control portions.
I'm saving a lot of money because I'm making my own sandwiches in the morning, mainly to enforce portion control. (Can't count on the work cafeteria, etc.) It has actually been pretty good because with weekly trips to the Farmer's market, they basically become gourmet sandwiches. "Splurging" on good ingredients and indulging in tasty condiments has helped quite a bit. Here's a typical week of lunches:
Monday: Southwest Turkey Sub, approx. 580 calories
6" of Bread & Cie Baguette, 2oz Peppered Turkey Breast (Deli Sliced), 2oz Swiss Cheese, 1/2cup Roasted Bell Pepper (bottled), 1 slice red onion, 1 tbsp Homemade Light Chipotle-Ranch Dressing (1 canned chipotle in ~1/2C Light Ranch Dressing, blended until smooth, leftover from a southwest style dinner salad Kim made...)
Tuesday: Ham & Cheese, Deutschland Style, approx. 600 calories
2 thin slices of Bread & Cie crusty loaf (Rosemary or Garlic/Goat, etc.), 2oz Black Forest Ham (Deli Sliced), 2oz Swiss Cheese, 1 leaf lettuce, 2 tbsp stoneground dijon mustard
Wednesday: Salami & Cheese, French Style, approx. 600 calories
6" of Bread & Cie Baguette, 2oz Dry Cotto Salami (I would have used Garlic Sausage if I could get it), 2oz Swiss Cheese, 1 leaf lettuce, 1/4 Heirloom tomato, 1 slice red onion, 1 tbsp brown mustard
Thursday: Ham & Cheese, French Style, approx 600 calories
6" of Bread & Cie Baguette, 2oz Black Forest Ham (Deli Sliced), 2oz Swiss Cheese, 1 leaf lettuce, 1 slice red onion, 1/4 Heirloom tomato, 1 tbsp Newman's Own Light Balsamic Vinegrette dressing
Friday: Mediterranian Turkey Sub, approx. 580 calories
Basically the same as the southwest sub, but substitute Vinegrette for the Chipotle Ranch, and add Heirloom tomato slices and a basil leaf or two...
Its been fun playing with a basic sandwich structure and varying just a couple of ingredients like dressings or the meat to see the different combos I can come up with. I've tried to take a few tips from Alton Brown's Good Eats "Sandwich Craft" episode as far as construction and wrapping to blend flavors and keep things together.
Having Swedish/German roots also means you always have 13 kinds of imported mustard in the house (I get this stuff in my Christmas stocking - Literally), and that helps. So far I haven't gotten bored. (2+ weeks into it)
Add these lunches to a 100 calorie prescription breakfast shake, and that leaves me a decent number of calories for afternoon snacks (also prescription) and/or a decent dinner. (1800 to 2000 calorie/day target, right now)
Dinners have gone well too. You figure out pretty quickly that herbs are basically free, and most veggies are nearly free. It also helps having to cook for a vegetarian, there's less temptation to stray too far into the more calorie-heavy meat dishes, etc.
My next weigh-in is in a couple of weeks. I'm optimistic. Read More...
Thursday, November 18, 2004
Just the Two of Us...
Wow, what a day. The week before Thanksgiving is definitely the time to come to a place like this. We've suspected most of the week, but now we're sure: We're the only guests in the villas right now. Whole place all to ourselves. Pretty amazing.
Not only that, but we had the Pink Jeep tour all to ourselves too. It was nice, I must say, since Kimberley got to ride shotgun (and thus avoid any motion sickness) and asked a million questions. The "Ancient Ruins" tour is really worthwhile. As a child I visited the various ruins at Tuzigoot, Montezuma's Castle, etc. and got very comfortable with the idea that they must be viewed from afar lest they be damaged. Well, imagine my surprise when this tour walks you right up to the ruins. Close enough to get some fabulous pictures of the petroglyphs, the construction, the whole mess.

I thought I knew a lot about the history of the area, but we learned quite a bit, especially about the differences between the time period of this particular dwelling versus some of the later ones seen elsewhere. Its thought this dwelling was home to the Ancestral Hopi from ~1100AD to ~1380AD, before the majority of them moved further north to join the other Hopi people. Their lifestyle was quite different than the Yavapai who followed, which makes for an interesting contrast.
In any case, it was a blast. Our guide was great and we really got the royal treatment since it was just the two of us.
After that and a quick lunch, we headed to the former Ghost-Town turned artist's community of Jerome. Toured quite a few more galleries, saw a lot of nice stuff, and even got to watch a glassblower work for a little while. At the last gallery we hit on our way out, we found a beautiful etching done by a local artist. The piece is printed by first etching the design onto a steel plate, then the plate is inked and then paper is rolled onto it. Each time through the process results in a slightly different piece, since the inking, etc. are all done by hand. In any case, its a beautiful piece. The artist is Robin Anderson and his style is right in between Leonardo DaVinci and Picasso's pen/ink drawings. Fun! Here's another piece that's similar. Its funny, Kimberley and I have such different tastes in art, but actually buying art is really easy because for some reason we always seem to both immediately latch on to some pieces, and that's how we know the piece is right for us. Neither of us is sure why, because one or the other of us will pass on lots of similar pieces, but there's almost always that "one piece". We capped the evening off with a private dinner for two by Chef Michael. My main course was the Duck with Armangac and Figs, and Kimberley had the Shrimp and Asparagus Risotto. Michael used to own two restaurants in the Big Easy, and sold them both to come out to Sedona and open this place. Top notch food, to be sure, and he'll have a cookbook out sometime next year. Very cool. Needless to say, we'll be sad to be leaving on Friday. The Adobe Grand Villas are fantastic, even if we hadn't had the whole place to ourselves! What a romantic trip! Cheers!
Read More...

I thought I knew a lot about the history of the area, but we learned quite a bit, especially about the differences between the time period of this particular dwelling versus some of the later ones seen elsewhere. Its thought this dwelling was home to the Ancestral Hopi from ~1100AD to ~1380AD, before the majority of them moved further north to join the other Hopi people. Their lifestyle was quite different than the Yavapai who followed, which makes for an interesting contrast.

In any case, it was a blast. Our guide was great and we really got the royal treatment since it was just the two of us.

After that and a quick lunch, we headed to the former Ghost-Town turned artist's community of Jerome. Toured quite a few more galleries, saw a lot of nice stuff, and even got to watch a glassblower work for a little while. At the last gallery we hit on our way out, we found a beautiful etching done by a local artist. The piece is printed by first etching the design onto a steel plate, then the plate is inked and then paper is rolled onto it. Each time through the process results in a slightly different piece, since the inking, etc. are all done by hand. In any case, its a beautiful piece. The artist is Robin Anderson and his style is right in between Leonardo DaVinci and Picasso's pen/ink drawings. Fun! Here's another piece that's similar. Its funny, Kimberley and I have such different tastes in art, but actually buying art is really easy because for some reason we always seem to both immediately latch on to some pieces, and that's how we know the piece is right for us. Neither of us is sure why, because one or the other of us will pass on lots of similar pieces, but there's almost always that "one piece". We capped the evening off with a private dinner for two by Chef Michael. My main course was the Duck with Armangac and Figs, and Kimberley had the Shrimp and Asparagus Risotto. Michael used to own two restaurants in the Big Easy, and sold them both to come out to Sedona and open this place. Top notch food, to be sure, and he'll have a cookbook out sometime next year. Very cool. Needless to say, we'll be sad to be leaving on Friday. The Adobe Grand Villas are fantastic, even if we hadn't had the whole place to ourselves! What a romantic trip! Cheers!
Tuesday, November 16, 2004
Things Grand...
OK, the cafe with the free wireless hotspot didn't materialize, so I'm sitting in a Starbucks-Analog in the village, writing this for the next time I get internet access.
The drive from San Diego to the Grand Canyon (Tusayan Village, actually), was a long one, but relatively uneventful. The directions were fairly simple so we skipped the GPS in favor of printed directions, but I was glad to have set up the Valentine 1, as we had one or two moments with the California and Arizona Highway Patrols.
I'd been worried about our first hotel, ambitiously named "The Grand Hotel", after reading some last minute bad reviews on Expedia or some other travel site... Turns out to have been unfounded. While far from "Grand", everything was clean and the food in the hotel restaurant wasn't bad. If you're ever in the area I recommend the Tenderloins of Elk in a Cherry Madeira Reduction with Shitake Potato Hash.
The Grand Canyon the following morning was suitably beautiful and of course more aptly named, especially so in the chilly November morning. I'm not sure if it was the early-ish hour (9am?) or the turning of the cold season, but we enjoyed a very quiet morning at the South Rim. We started with one of the basic vista points, which impressed Kimberley quite a bit, took a bunch of pictures, and started to head out on our way when she spotted a small herd of Elk grazing on the side of the road. Yep, Elk. One male and two females, by my count. They hardly noticed the group shooting photos, only the male took any notice of Kimberley when she stood on a small rock to get a slightly better photo...
After that we bounced west along the south rim, stopping at a few places to look and take pictures. We stopped in at the village post office to send a couple of postcards and had another reminder of how tech-centric we've become. Kimberley had forgotton her parent's mailing address, and there was no cell phone coverage, so we attempted what was, for both of us, the first pay-phone call in many years. Apparently you can't call California from Arizona from a payphone with coins anymore. We actually had to get a long distance operator and use a credit card to make the call. I guess there's still a place for calling cards these days, but I haven't used one in years since its always cheaper/easier on a cellphone...
After that minor adventure we ended up at the rim lodges. We started out on the hiking trail that follows the rim. It was a beautiful walk, but I figure we only got 2 or 3 miles before the altitude and the climb (quite a bit of elevation change) got to Kimberley and we started taking the rim loop shuttle. If you're not up for a long walk, this is definitely the only way to fly. You can get off at any of a number of vistas, see the views, then get back on the next shuttle. The loop ends at Hermit's Rest, where the views are even more amazing. 
After that, we had a beautiful lunch at the El Tovar hotel, and then on our way to Sedona. I'll just say that the drive and the vistas were exceptional. More photos to come when I've got more time. Cheers... Read More...

After that, we had a beautiful lunch at the El Tovar hotel, and then on our way to Sedona. I'll just say that the drive and the vistas were exceptional. More photos to come when I've got more time. Cheers... Read More...
Subscribe to:
Posts (Atom)

 Posts
Posts

