It's time for another project. Back in June, we celebrated our Anniversary, and Kimberley gifted me with a wonderful subscription to Bespoke Post. My first "box" was a seriously complete shoe shine kit.
I already had a few bits and pieces for caring for my few items of quality leather footwear, but like many guys, I was storing it all in an old shoebox. As I've invested recently in some better shoes, this was a fitting gift, but it was so upscale that it felt awkward just to chuck it all into the same ratty old box.
I remembered that I had an old wooden box that had belonged to my Grandfather. It had been among his vast trove of random objects in his garage after he'd passed away. When my mother conveyed to me a small collection of hand-tools from his bench, she used the wooden box to carry them. Honestly, I have little idea what the box would have originally been used for, but I understand why it was there - like my Grandfather I'm always loathe to discard any object that can be made useful again.
A simple box, devoid of markings or hardware
Appears to have been previously lined on top, and may have had an "insert" in the bottom.
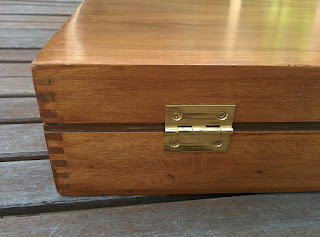
Based on its construction details like the way the lining had been glued and the fact that it looked originally to have had fabric hinges stapled in, and no other hardware, I suspect it had been rather inexpensively made some time ago. Inexpensively, but not badly. There were some pretty box joints at the corners, and it was all solid wood. From the size, and these details, I'm guessing it was originally a gift box that housed a pair of nice bottles of wine or the like.
To begin, I have everything a decent sanding. The top and sides were still in fairly good shape, so I didn't do much here. The bottom was fairly badly worn, but I didn't want to go crazy with removing every mark - I wanted this box to have some character, so I just took out some of the marks but left the deeper gouges more or less intact.
Next I performed all the woodworking operations. I pre-drilled to fit some brass hinges where the fabric had originally passed through. Since the lifting handle on the front precluded the easy installation of a latch, I also drilled recesses in the forward corners to receive magnets that will hold the box closed. One more sanding to clean up from these steps.
Finally, I was ready to start the finishing process. I applied two coats of wipe-on Minwax gel stain. I let Annika pick the color, I think it was "Honey Maple". And a light sanding between each coat, of course.
After staining, more light sanding, interspersed with three coats of wipe-on polyurethane. I tried to use only burlap to take off the tackiness from the poly, but didn't meet with success. In the end, I had to use some 0000 Steel Wool, against manufacturer recommendations.
After the poly cured, it was time for the lining. Kimberley was climbing the walls for weeks trying to recycle the cereal boxes I'd been collecting for this stage. I needed some thin, non-corrugated cardboard to wrap the felting around, and these were the only source on hand.
I cut the cardboard for one main top/bottom panel and four side strips for each half of the box. These were cut with a framing square and a utility knife with a hardboard backer.
Pardon the lighting, I was trying to work in the shade.
I pre-cut the felt oversized for each piece. Then I sprayed the felt with 3M Super-77 adhesive and lay the cardboard down, then I wrapped the edges over.
Corners were mitered by folding in both edges in at 45° then trimming while pulling on the fold. I have a grubby pair of scissors just for things that have been sprayed with Super-77. I use it that often.
The top and bottom panels were fitted first. Another shot with Super-77 made sure the panel would stay fixed to the wood, but isn't 100% permanent, should I ever need to re-do this process.
The side panels were fitted in the same way, but it starts to get hard to calculate the tolerance stack-up of the thickness of the layers of bard and felt. First, I needed to re-trim the height of each side piece to account for the thickness of the main top/bottom panels. Next, came the lengths. The best approach was to fit the two long edges of a box first, then put the felt and cardboard for a short edge in for a test-fit and trim as needed. I found that I needed to remove 1/8" to 3/16" from each edge.
With all the felt panels installed, it was time for hardware.
I installed the brass hinges, but first needed to nip the end of each screw to avoid punching into the inside of the thin wooden walls.
The corner magnets were checked for polarity, marked on the "back" side, and then super-glued into the pre-drilled recesses.
Finally, someplace to put my lovely Bespoke Post gift box.
And room to add the few extra pieces I was already using.
My Grandfather would have been proud. A handsome box, preserved from the garbage, and turned into something that will serve me for many years going forward.


2 comments:
Hey Mike, you did a really nice job with that!
You may find this interesting: A shoe box we make from scratch that has some additional functionality: http://www.americanshineco.com/shop-mens-shoeshine-supplies/complete-shoeshine-kit
It is so nice to see such careful treatment of something from Grandpa. I miss him so much everyday and this homage to his treatment of things makes me happy. Thank you for sharing that special gift.
Kathy
Post a Comment