Needed a break from reading specs at work today, decided to update my implementation of my Altoids-tin-turned-iPod-case.
Originally, I had trimmed a section of the original vacuum formed plastic Shuffle packaging to fit the Altoids tin. It had the Shuffle-shaped recess to hold the player and a bit of "flange" sticking out to keep this section from moving around too much. There were two major negatives of this implementation:
- The extra plastic that held things in place left very little room for the earbuds. Unless I was very careful about coiling the cord and put the buds in place just right, then the case wouldn't close reliably. This was dumb because there was plenty of wasted volume under this bit of plastic.
- Listening to the shuffle meant removing it from the tin and either clipping it to the lanyard (which I don't always wear because it also has my RFID work badge), or leaving the shuffle to bang around in my pocket or bag.
Inspired by
Adam Whitlock's and
ChriSamo's superior Altoids mods, I set about working out my own solution, which I think it simpler than either of these, but accomplishes much of the same function. Here are the steps for mine, hope you can follow along. (Once again, pics courtesy of my Motorola V600 cameraphone with a dirty lens, so excuse the picture quality.)
- First I needed to solve the problem of too-little room for the earbuds. I re-trimmed the fitted rectangular recess so that it was mostly just the space for the Shuffle, with a very short flange on the topside to space the Shuffle away from the edge of the tin just slightly. This made tons of room for the earbuds, but the fitted plastic is free to move around the tin which would be very inconvenient. Note that since I planned to be able to plug the earbuds in through the case, I trimmed the fitted-rectangle so that it was slightly off center, placing the jack as close to one edge of the tin as possible.
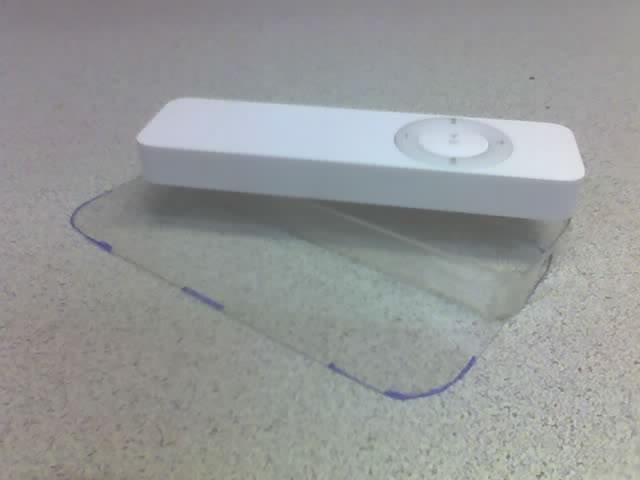
- Next, I scrounged a new piece of thin vacuum-formed
 plastic, with a flat section large enough to cover the bottom of the Altoids tin. I think mine was from an OEM hard drive blister pack or something similar. Laying this over the top of the tin, I marked the corners and trimmed it to fit snugly into the tin. You can still see the markings in the photo, which is helpful to see the shape, since its clear plastic on a light colored background. This will serve as a "baseplate" which will keep things from moving around inside the tin.
- I placed the new baseplate into the tin, and then the fitted rectangle on top of it. I used three small drops of superglue to attach them to each other, but not to the tin. (Its helpful to be able to remove this assembly from the tin, either to replace the tin if it gets damaged, or for convenient marking if you're proceeding with Step 4.)
- OK, that takes care of the
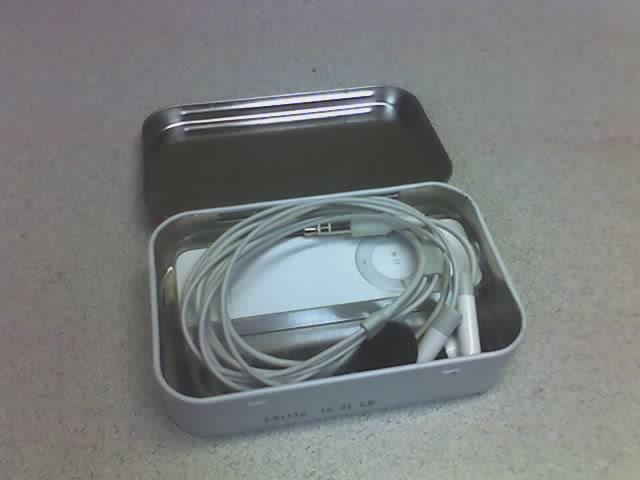
 earbud problem, now there is plenty of room for the buds, but the Shuffle-shaped plastic is held firmly in place inside the tin. If you don't care if you are able to listen to the Shuffle while it's in the tin, you can stop now. Otherwise, continue: I removed the plastic assembly from the tin, and inserted the Shuffle into the recess, then marked the location of the earbud jack with a fine-tipped marker.
 - Remove the Shuffle and make a hole 3/16" to 1/4" in diameter in the plastic. Note that in order for the earbuds to plug all the way in, the hole needs to be as big as the wide portion of the plug, not just the 1/8" width of the tip-ring-sleeve portion. To make the hole, do whatever you feel is safe that will make a clean hole. Don't stab yourself in the hand trying to poke through with a knife. Easiest is to make a small hole and file it out, or heat a 1/4" piece of rod to red-hot and just melt a hole...
- After confirming that the hole is in the right place, and big enough for the jack, temporarily replace the plastic assembly in the tin and use it as a template for marking for a hole in the
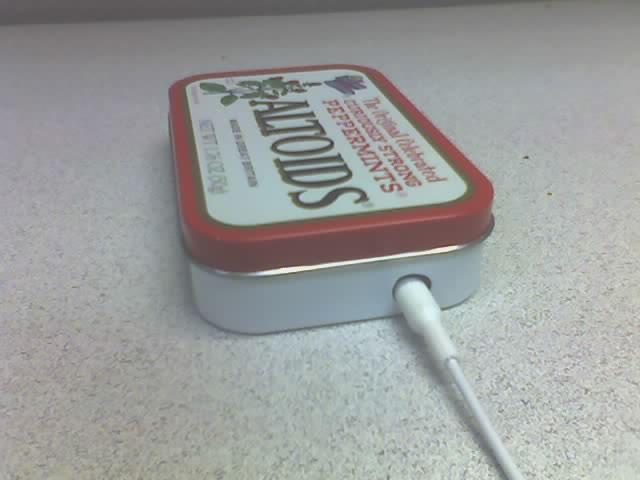
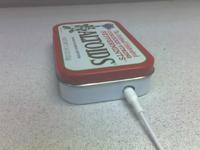 side of the tin. The easiest thing for me was to use a sharp scribe to just barely mark the center of the hole from the inside, then centerpunch and drill the hole from the outside,(after removing the plastic, of course). If you have a tapered reamer, I'd drill a small pilot hole and then ream the hole to size, for safety. If you're careful, you should be able to drill it to size, just be careful of the drill bit grabbing into the thin sheetmetal as you punch through the tin. Clean up the hole, if needed, and reinsert the plastic assembly for the final time. Voila', you can now store your iPod Shuffle and earbuds in armored security or have the option of listening to the Shuffle while its in the tin.
So there you have it. Once again, a hack that takes longer to document than it takes to perform. In the spirit of Adam Whitlock's cost breakdown, here's mine, which I think you'll find superior:
- One Altoids tin - If you're like me, you've got 20 in a drawer somewhere (Free), if not: $2.00 or so...
- The original vacuum-formed blister pack from your iPod Shuffle package. (Free). If you didn't keep this, you'll need to try one of the other mods listed above.
- A flat piece of thin plastic large enough to fit the bottom of the Altoids tin. There might be a large enough piece from the original packaging for this purpose, I don't remember. Just about anything will work here... (Free)
- 3 Drops of Superglue, borrowed from a tube at work. (Free, or ~$1 for more than you're ever need.)
NOTE: One thing I haven't done, but considered: You could cut out the back portion of the tin to allow access to the off/on/shuffle switch. For me, its not a big deal to flip the Shuffle out of the tin when I'm grabbing the earbuds anyways, so I wanted to keep the case as intact as possible to keep out the crud. Some folks, however, might want a little more access...
Read More...
Summary only...


