Showing posts with label iPod. Show all posts

Tuesday, August 09, 2005

Hack of the Day: Altoids iPod Armor Redux

Needed a break from reading specs at work today, decided to update my implementation of my Altoids-tin-turned-iPod-case.

Originally, I had trimmed a section of the original vacuum formed plastic Shuffle packaging to fit the Altoids tin. It had the Shuffle-shaped recess to hold the player and a bit of "flange" sticking out to keep this section from moving around too much. There were two major negatives of this implementation:
  1. The extra plastic that held things in place left very little room for the earbuds. Unless I was very careful about coiling the cord and put the buds in place just right, then the case wouldn't close reliably. This was dumb because there was plenty of wasted volume under this bit of plastic.
  2. Listening to the shuffle meant removing it from the tin and either clipping it to the lanyard (which I don't always wear because it also has my RFID work badge), or leaving the shuffle to bang around in my pocket or bag.
Inspired by Adam Whitlock's and ChriSamo's superior Altoids mods, I set about working out my own solution, which I think it simpler than either of these, but accomplishes much of the same function. Here are the steps for mine, hope you can follow along. (Once again, pics courtesy of my Motorola V600 cameraphone with a dirty lens, so excuse the picture quality.)

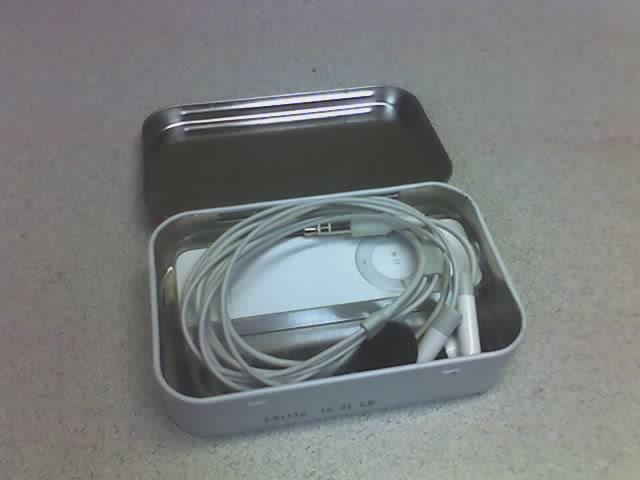
  1. First I needed to solve the problem of too-little room for the earbuds. I re-trimmed the fitted rectangular recess so that it was mostly just the space for the Shuffle, with a very short flange on the topside to space the Shuffle away from the edge of the tin just slightly. This made tons of room for the earbuds, but the fitted plastic is free to move around the tin which would be very inconvenient. Note that since I planned to be able to plug the earbuds in through the case, I trimmed the fitted-rectangle so that it was slightly off center, placing the jack as close to one edge of the tin as possible.
  2. Next, I scrounged a new piece of thin vacuum-formed plastic, with a flat section large enough to cover the bottom of the Altoids tin. I think mine was from an OEM hard drive blister pack or something similar. Laying this over the top of the tin, I marked the corners and trimmed it to fit snugly into the tin. You can still see the markings in the photo, which is helpful to see the shape, since its clear plastic on a light colored background. This will serve as a "baseplate" which will keep things from moving around inside the tin.
  3. I placed the new baseplate into the tin, and then the fitted rectangle on top of it. I used three small drops of superglue to attach them to each other, but not to the tin. (Its helpful to be able to remove this assembly from the tin, either to replace the tin if it gets damaged, or for convenient marking if you're proceeding with Step 4.)
  4. OK, that takes care of the earbud problem, now there is plenty of room for the buds, but the Shuffle-shaped plastic is held firmly in place inside the tin. If you don't care if you are able to listen to the Shuffle while it's in the tin, you can stop now. Otherwise, continue: I removed the plastic assembly from the tin, and inserted the Shuffle into the recess, then marked the location of the earbud jack with a fine-tipped marker.
  5. Remove the Shuffle and make a hole 3/16" to 1/4" in diameter in the plastic. Note that in order for the earbuds to plug all the way in, the hole needs to be as big as the wide portion of the plug, not just the 1/8" width of the tip-ring-sleeve portion. To make the hole, do whatever you feel is safe that will make a clean hole. Don't stab yourself in the hand trying to poke through with a knife. Easiest is to make a small hole and file it out, or heat a 1/4" piece of rod to red-hot and just melt a hole...
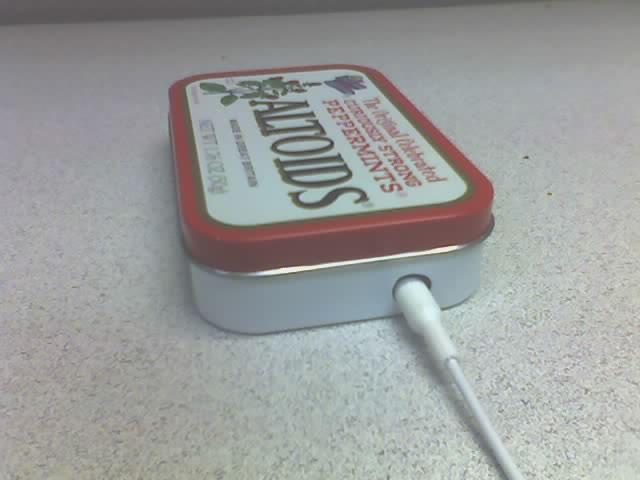
  6. After confirming that the hole is in the right place, and big enough for the jack, temporarily replace the plastic assembly in the tin and use it as a template for marking for a hole in the side of the tin. The easiest thing for me was to use a sharp scribe to just barely mark the center of the hole from the inside, then centerpunch and drill the hole from the outside,(after removing the plastic, of course). If you have a tapered reamer, I'd drill a small pilot hole and then ream the hole to size, for safety. If you're careful, you should be able to drill it to size, just be careful of the drill bit grabbing into the thin sheetmetal as you punch through the tin. Clean up the hole, if needed, and reinsert the plastic assembly for the final time. Voila', you can now store your iPod Shuffle and earbuds in armored security or have the option of listening to the Shuffle while its in the tin.
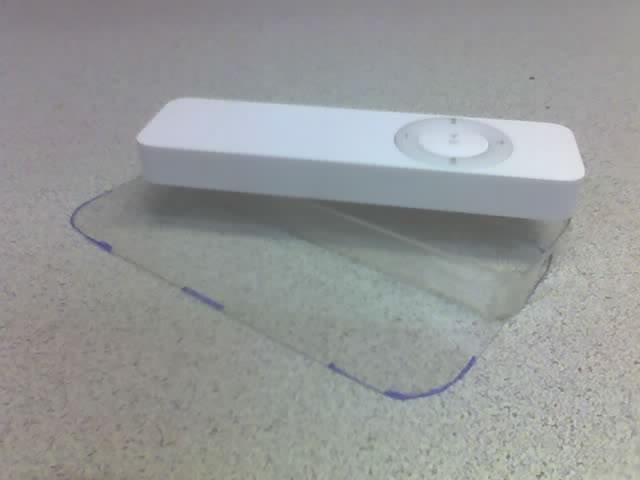
So there you have it. Once again, a hack that takes longer to document than it takes to perform. In the spirit of Adam Whitlock's cost breakdown, here's mine, which I think you'll find superior:
  • One Altoids tin - If you're like me, you've got 20 in a drawer somewhere (Free), if not: $2.00 or so...
  • The original vacuum-formed blister pack from your iPod Shuffle package. (Free). If you didn't keep this, you'll need to try one of the other mods listed above.
  • A flat piece of thin plastic large enough to fit the bottom of the Altoids tin. There might be a large enough piece from the original packaging for this purpose, I don't remember. Just about anything will work here... (Free)
  • 3 Drops of Superglue, borrowed from a tube at work. (Free, or ~$1 for more than you're ever need.)
NOTE: One thing I haven't done, but considered: You could cut out the back portion of the tin to allow access to the off/on/shuffle switch. For me, its not a big deal to flip the Shuffle out of the tin when I'm grabbing the earbuds anyways, so I wanted to keep the case as intact as possible to keep out the crud. Some folks, however, might want a little more access... Read More...

Friday, July 29, 2005

What's in your bag?

What's in your bag today?

I got reminded of the Flickr What's in your bag? tag project-thing today while reading Zen Pockets on my lunch break. It inspired me to check my current loadout, and see where I could make improvements.

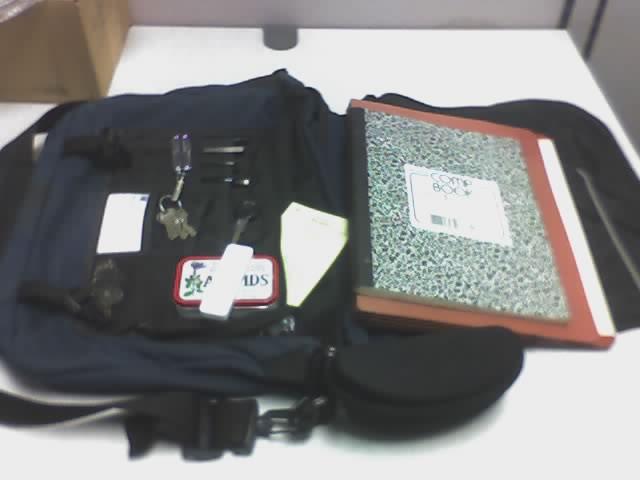
So here it is, albeit without the fancy box-highlighted images from Flickr, more or less Left-to-Right and Top-to-Bottom:

  1. The Bag: My ancient Jansport bar-top messenger that I've had since my 2nd year of college. This thing has hauled everything from school books to hammers and raw steel. In fact, it looks like its sort of on its last legs. Its back in service because my daily collection of stuff was becoming too much for "on my person" carry, especially in the warmer summer months (shorts), and especially when I'm switching cars all the time. (I drive the Miata a lot more in the summer).
  2. Business cards, or at least last month's iteration thereof. We did a reorg again this month, need to check if everything is still correct...
  3. Loose change, for the odd parking meter or vending machine.
  4. Leatherman Squirt S4, my current favorite micro-multitool. I've got a whole mess of these things with various tools, this seems to be the current best mix. I carry it just about everywhere (except airports) because it sees almost daily use. It has a plunger quick-disconnect to:
  5. Keys #1: House, mailbox, office, etc. type keys. These go almost everywhere too, mostly because I like to be able to get into my house and stuff... :) Not to be confused with:
  6. Key(s) #2: The key(s) and whatever transmitters might be needed for whatever car I'm driving that day. Today its the Miata. These go in the other pocket when I'm bagless...
  7. Writing instruments: Usually some mix of fine and ultra-fine uniballs in black and blue, a 0.7mm mechanical pencil, and a new addition: a fine "sharpie". Added recently for marking silver coins prior to annealing for my stone setting class.
  8. Altoid's Tin turned iPod case: I trimmed the vacuum-formed plastic insert from the original Shuffle packaging to fit into a tin. It holds the player and earbuds in geek-chic luxury while protecting everything and keeping it clean.
  9. A stack of UCSD Evening parking permits. It was a major revelation when I figured out I could buy these things in bulk. For some reason it never occurred to me and I was buying them one-at-a-time for years.
  10. Standard Black "Comp Book", grid ruled. Mostly used for sketching pieces and planning work for my metalsmithing, but occasionally I take notes in it too.
  11. Letter-size accordion file. This holds the comp book and all the loose papers I seem to collect, like a list of local suppliers for my metalsmithing classes or a list of instructions from the Judge at jury duty. It also serves to add a little rigidity to my aging nylon bag, so the heavy stuff at the bottom doesn't make it sag when I don't have a book or my laptop with me...
  12. One 12" cable tie. Who knows, I must have thought I needed it.
  13. Semi-hard case for my Sunglasses, clipped to the bag's shoulder strap. Picked up a set of Maui Jim glasses on Oahu last month, its the first set of "nice" sunglasses I've owned in quite a while. We'll see how long they last.
  14. Motorola V600 Cameraphone (not shown) - I used to think cameraphones were silly, at least until I got one. I use it all the time now. Mostly I use the camera instead of taking notes. I'll photograph a price tag or store display to get a crucial model number or the physical dimensions of a piece of furniture. Also comes in handy for remembering the vintage of that great bottle of wine we had at dinner... I've always used my cellphone as a PIM, and that functionality keeps getting better, to the point that I just can't justify carrying a PDA. I just wouldn't use it. I've seen a Blackberry or two I could probably trade for my phone, but not many. The phone usually lives in the bag now, but I used it to photograph this whole mess, hence the less-than-ideal image quality. I didn't say it was a great camera.
  15. My Wallet of Doom (not shown) - This is the one thing I really need to work on. I've gone on several pocket diets, but I just can't seem to keep the weight off. My keyrings are now wonderfully spartan, but I haven't managed to shed all the club cards, discount cards, etc. that make a wallet so fat. Maybe I'll find a way to take a page from the Zen Pockets article and move some of that stuff off to a sub-wallet I can throw in my bag...


So, what's in your bag today? Next trick is to tackle Kim's bag, maybe we can shave 3 or 4 pounds out of it... Read More...

Tuesday, May 17, 2005

30 Second Hack - Play your iPod Shuffle while charging!

So every now and then I whip out some quick little hack to make my life (or someone else's life) easier. I rarely even take the time to document them, since usually the hack is so trivial as to make documentation insulting.

The last one was this little circuit for a bloke on Miata.net. Yes, I'm a lazy bastard, I didn't really draw the circuit so much as link to one someone else drew, and tell him what resistors to use. But the point is, I applied my hard-earned BSEE to the gripping problem that was this dude's garage door opener.

Well, here's another 30 second Hack. I'll literally spend 10x more time with this blog entry than I spent on the hack:

How to play tunes on your iPod Shuffle while charging the battery.

Problem: The iPod shuffle both charges its battery and does data exchange (iTunes and thumb-drive) via its built-in USB port. Normally this is great, except that for some inexplicable reason, any time the iPod has a data connection going, it disables the player functionality.

Why is this a problem? If you're sitting at a PC, why not just use the PC to play music? In my case, I work at any number of PCs, both in my office and in the lab. For various reasons (company policy, not the least of which), I don't have iTunes installed or any .mp3s loaded on any of these machines.

So my choices are to either play my iPod and run the battery down, despite being inches from a suitable charging port, or to charge the batteries in silence. Dumb.

Solution: I made a USB "Power Cord" which charges the battery but doesn't establish a data connection, so the iPod keeps-on-a-rockin'.

For background, consult the USB pinout standard, but you can just duplicate this in all is simple-gory details below.
You'll need the following:

Parts: Electrical Tape, 1 USB Extension Cable with suitable ends (probably Male 'A' and Female 'A')
-or- a regular A-B cable and one of those Female-B to Female-A adaptors (which is what I used because we have literally hundreds of these things lying around at work).

Tools: X-acto Knife, Cutters

Disclaimer: If you somehow manage to mess this up and fry your iPod or your PC's USB port, I accept no responsibility for this. Simply disabling the data lines should be safe, if you can accomplish that task without doing anything stupid.


Procedure:
  1. Using the X-acto knife, Slit about 1" of the USB cable's outer insulation, preferably near the iPod end, but it doesn't really matter.
  2. Your cable probably has a woven shield and/or a foil jacket around the actual wiring. Try to slit and part this to expose the 4 wires, while doing the minimum amount of damage here.
  3. Using the cutters, snip the Green and White wires (data lines). For neatness, I actually snipped out about a 1/4" of these wires just to make sure they wouldn't short to each other. I suppose the really anal types might work harder to ensure no shorting of the data lines to the shielding occurs. I didn't. Doesn't seem to matter.
  4. Tuck the wires back into the shield weave/foil.
  5. Wrap electrical tape around the slit.
  6. If you're like me, the electrical tape will be a sufficient indicator that this is now a USB POWER CABLE which will no longer serve any other purpose. Otherwise, you might want to label the cable somehow, so the next unsuspecting geek doesn't try to use it to sync his PDA or something...
  7. Plug in the cable to your PC or hub. Plug in the iPod to the cable. Confirm that the amber light on the battery indicator is lit (charging). Marvel at the amazing ability to charge the battery and listen to music at the same time.
Yep, that's it. Told you it was simple. Apple will probably make a "iPod Shuffle Computer Charging Cable" at some point and sell it for $29... Read More...