Well, I got approval from the venue for this year's Maker Faire to stay in the RV lot without an RV (sleeping in the Fraggin' Wagon), so I've ordered my tickets and I'm bound for Maker Faire!!
I've got friends-of-friends to visit, and fellow makers I've been corresponding with online whose wares I need to peruse, so I hope to see you there!
Read More...
Sunday, April 20, 2008
Low Budget Wine Cellar from Refrigerator
'Round my house, we love wine. A lot.
At one point we had so much wine in the house that in order to keep track, I wrote an Access database program I dubbed "Wine Collector" (in homage to my favorite DVD database product Movie Collector).
We aren't really snobs, we'll drink a big range of stuff, but some of the wine we have is pretty good, and we'd like to keep it that way. Unfortunately, commercial wine cellars (aka "wine coolers" or "wine fridges") are pretty expensive, especially if they hold any reasonable amount of wine. The smaller units are typically underpowered vanity items that only store one or two dozen bottles, and usually don't do it very efficiently. There are some exceptions of course, high quality under-counter jobbies made by reputable companies with quality refrigeration hardware, but these are nearly as expensive as the larger models of any measurable quality.
So what to do? Well, for us we did what a lot of people do, which is that we put our wine at risk. We stored it in the house, at room temperature and uncontrolled humidity. Where possible, we squirreled cases away in the tops of closets, etc., but generally, it was somewhere in the house. I don't even want to think about what this may have done to something like a 2001 El Molino Pinot Noir.
Then, I stumbled across some wine collector websites where some people had been converting old fridges to wine cellars. Either by hacking the existing thermostat, or using some sort of external controller, the unit can be setup to hold a temperature more appropriate for wine (about 54° for mixed reds/whites).
Luckily, I already had an unused fridge to start with. When we moved to our new home, we brought along our old refrigerator. The buyer of the old house didn't want it, and my wife really wanted to keep it because she liked the bottom-freezer layout. After arriving, however, we figured out that the proximity of the kitchen cabinets opposite the fridge location meant that we'd be limited to side-by-side configurations, because the sweep of the doors would interfere with the cabinet. Bummer. So that fridge sat in the garage, waiting for me to clean it up and sell it or convert it to the "beer fridge". Well, now it had a more noble (and wife approved) mission ahead of it: Wine Cellar.
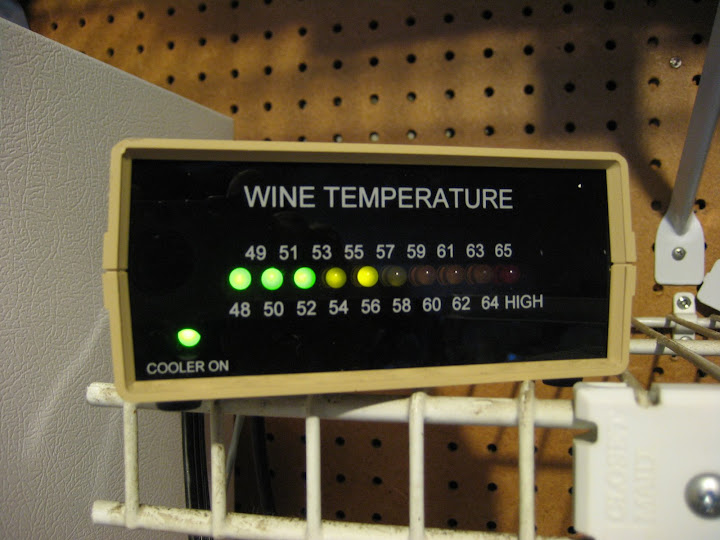 With some poking around looking for an appropriate thermostat unit, I stumbled across and older model WineStat unit on eBay, and it was mine for an uncontested $10 bid. I'm not sure how much this model was originally, but the new digital display models are $170, so I think I did ok!
After cleaning up and sterilizing the inside of the fridge (it sat for almost two years!), all I needed to complete the transformation was a way to store wine inside.
The WineStat webpage has some interesting ideas about low-cost wine racking solutions, but I chose to go with the very reconfigurable "Tinker-Toy" style racks from J.K. Adams. As it happened, Crate and Barrel had these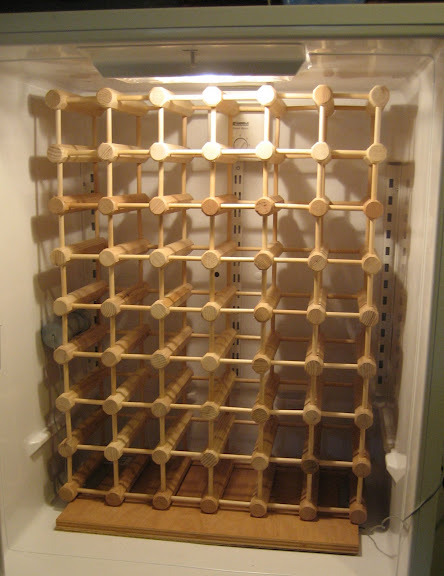 in their outlet store as "irregulars" for $19.95 for each 12-bottle kit. In this case, "irregular" meant inconsistent woodgrain color, which I was completely fine with. A "12-bottle" kit really means you get 16 "beams" and a whole pile of pins to configure however you please. With four of these kits (less one leftover beam and a few pins) I was able to build a solid 48 bottle unit that fit perfectly with room for air to circulate.
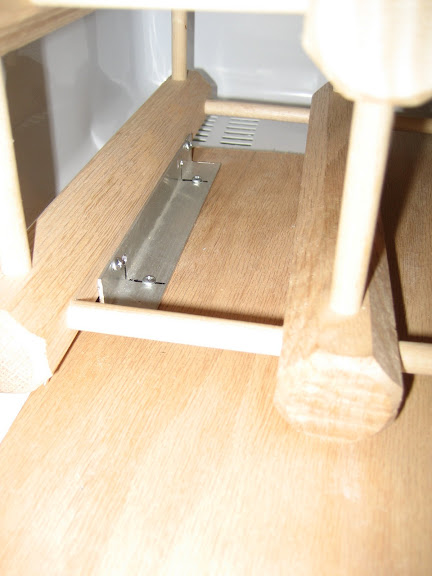 The wooden platform underneath was a leftover bit of oak cabinetry ply that flattens out the floor of the fridge box so the rack sits level. I had to cut a notch in the back left corner to clear the raised vent where cool air flows from the freezer to the fridge. A couple of quick mounting brackets made from aluminum keeps everything locked down and stable:
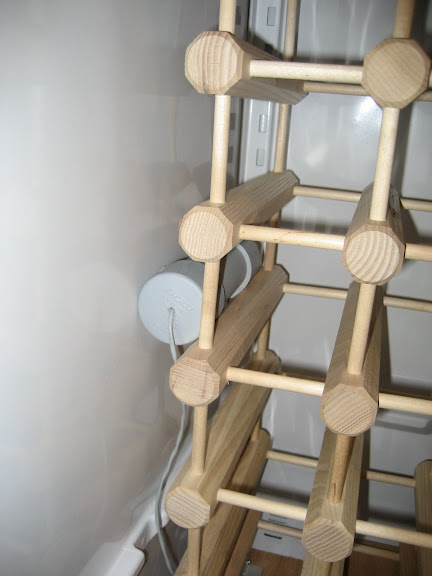 Then its just a matter of inserting the probe into the rack and plugging everything in. The probe should be centered in the box, its off to the side here while I finalized installation.
Most people don't realize that modern refrigerators depend on the thermal mass inside to help regulate the temperature. I tested the setup with several gallons of water in containers in the fridge and freezer boxes first. Once I was confident it would hold temperature, in went the wine rack, and shortly after, the wine!
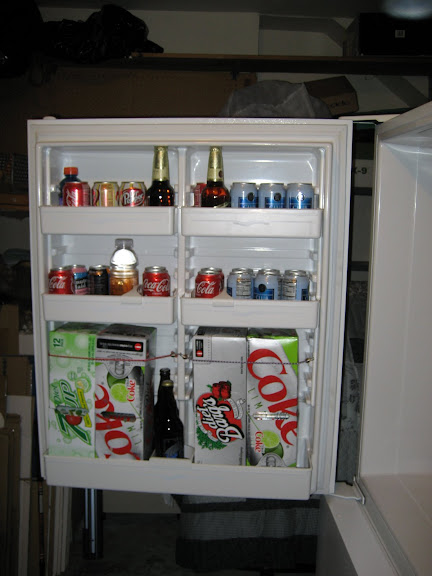 Agitation is bad for wine, so I resisted the urge to pack in more bottles using the spaces in the door. Instead, I filled this area with the soda, beer, and other beverages that would have otherwise been stored in the pantry. Its not ice-cold refreshing, but its pre-chilled which saves work for the in-house fridge when items are transferred there for consumption.
Your fridge may vary, but during my bottles-of-water testing I found that in order to keep the fridge box at a wine-friendly 55°, the freezer box ended up cycling around 30-32°. This is below freezing, but not in a zone that I feel is safe for frozen food storage.
In order to turn this into a win-win-win situation, I'm keeping the freezer box filled with gallon bottles of commercial drinking water in PET containers (with room made for freezing expansion). This constitutes part of my backup water supply in case of emergency (my wife lived through the Northridge quake and we've been on evacuation notice for wildfires here twice in the last 4 years). Having additional ice on hand will also allow me to transfer to the in-house freezer to keep frozen food safe longer if we lose power during an emergency. Lastly, the frozen mass of water helps stabilize the box temperature as the thermostat controller goes through its hysteresis, which also lets the box stay "off" longer, using less power.
The only issue left to be resolved is humidity. 60-70% would be best for keeping the corks happy, but food fridges are usually pretty dry. For now I'll probably keep a small tin of water in the box, but I plan on investigating the humidifier units people use for large cigar humidors.
All up, I've expended less than a $100 cash and a few hours time to clean up the old fridge, assemble the tinker toys, and mount and test the system. More pictures with detail photos of some items are available in the album: Low-Budget Wine Cellar.
(04/21/08)UPDATE: I've added new photos to the album. You can see that our cellar is already full. Time to have a party! Read More...
At one point we had so much wine in the house that in order to keep track, I wrote an Access database program I dubbed "Wine Collector" (in homage to my favorite DVD database product Movie Collector).
We aren't really snobs, we'll drink a big range of stuff, but some of the wine we have is pretty good, and we'd like to keep it that way. Unfortunately, commercial wine cellars (aka "wine coolers" or "wine fridges") are pretty expensive, especially if they hold any reasonable amount of wine. The smaller units are typically underpowered vanity items that only store one or two dozen bottles, and usually don't do it very efficiently. There are some exceptions of course, high quality under-counter jobbies made by reputable companies with quality refrigeration hardware, but these are nearly as expensive as the larger models of any measurable quality.
So what to do? Well, for us we did what a lot of people do, which is that we put our wine at risk. We stored it in the house, at room temperature and uncontrolled humidity. Where possible, we squirreled cases away in the tops of closets, etc., but generally, it was somewhere in the house. I don't even want to think about what this may have done to something like a 2001 El Molino Pinot Noir.
Then, I stumbled across some wine collector websites where some people had been converting old fridges to wine cellars. Either by hacking the existing thermostat, or using some sort of external controller, the unit can be setup to hold a temperature more appropriate for wine (about 54° for mixed reds/whites).
Luckily, I already had an unused fridge to start with. When we moved to our new home, we brought along our old refrigerator. The buyer of the old house didn't want it, and my wife really wanted to keep it because she liked the bottom-freezer layout. After arriving, however, we figured out that the proximity of the kitchen cabinets opposite the fridge location meant that we'd be limited to side-by-side configurations, because the sweep of the doors would interfere with the cabinet. Bummer. So that fridge sat in the garage, waiting for me to clean it up and sell it or convert it to the "beer fridge". Well, now it had a more noble (and wife approved) mission ahead of it: Wine Cellar.
 With some poking around looking for an appropriate thermostat unit, I stumbled across and older model WineStat unit on eBay, and it was mine for an uncontested $10 bid. I'm not sure how much this model was originally, but the new digital display models are $170, so I think I did ok!
After cleaning up and sterilizing the inside of the fridge (it sat for almost two years!), all I needed to complete the transformation was a way to store wine inside.
The WineStat webpage has some interesting ideas about low-cost wine racking solutions, but I chose to go with the very reconfigurable "Tinker-Toy" style racks from J.K. Adams. As it happened, Crate and Barrel had these
 in their outlet store as "irregulars" for $19.95 for each 12-bottle kit. In this case, "irregular" meant inconsistent woodgrain color, which I was completely fine with. A "12-bottle" kit really means you get 16 "beams" and a whole pile of pins to configure however you please. With four of these kits (less one leftover beam and a few pins) I was able to build a solid 48 bottle unit that fit perfectly with room for air to circulate.
 The wooden platform underneath was a leftover bit of oak cabinetry ply that flattens out the floor of the fridge box so the rack sits level. I had to cut a notch in the back left corner to clear the raised vent where cool air flows from the freezer to the fridge. A couple of quick mounting brackets made from aluminum keeps everything locked down and stable:
 Then its just a matter of inserting the probe into the rack and plugging everything in. The probe should be centered in the box, its off to the side here while I finalized installation.
Most people don't realize that modern refrigerators depend on the thermal mass inside to help regulate the temperature. I tested the setup with several gallons of water in containers in the fridge and freezer boxes first. Once I was confident it would hold temperature, in went the wine rack, and shortly after, the wine!
 Agitation is bad for wine, so I resisted the urge to pack in more bottles using the spaces in the door. Instead, I filled this area with the soda, beer, and other beverages that would have otherwise been stored in the pantry. Its not ice-cold refreshing, but its pre-chilled which saves work for the in-house fridge when items are transferred there for consumption.
Your fridge may vary, but during my bottles-of-water testing I found that in order to keep the fridge box at a wine-friendly 55°, the freezer box ended up cycling around 30-32°. This is below freezing, but not in a zone that I feel is safe for frozen food storage.
In order to turn this into a win-win-win situation, I'm keeping the freezer box filled with gallon bottles of commercial drinking water in PET containers (with room made for freezing expansion). This constitutes part of my backup water supply in case of emergency (my wife lived through the Northridge quake and we've been on evacuation notice for wildfires here twice in the last 4 years). Having additional ice on hand will also allow me to transfer to the in-house freezer to keep frozen food safe longer if we lose power during an emergency. Lastly, the frozen mass of water helps stabilize the box temperature as the thermostat controller goes through its hysteresis, which also lets the box stay "off" longer, using less power.
The only issue left to be resolved is humidity. 60-70% would be best for keeping the corks happy, but food fridges are usually pretty dry. For now I'll probably keep a small tin of water in the box, but I plan on investigating the humidifier units people use for large cigar humidors.
(04/21/08)UPDATE: I've added new photos to the album. You can see that our cellar is already full. Time to have a party! Read More...
Subscribe to:
Posts (Atom)

