Showing posts with label Prepared. Show all posts

Wednesday, March 04, 2009

Four more lives that could have been saved by PLBs

So apparently this is turning into the 406MHz Personal Locator Beacon advocacy blog, but dammit this is important. Since I wrote last week about the out-of-bounds skier who died due to a cascade of missteps both personal and professional, two more stories of tragedy have hit the news. Once again, both stories could have been very different if someone had bothered to make the investment in a PLB.


Image courtesy of cnn.comFirst, there was the boating accident that saw two NFL players and their friend lost at sea. One man survived by clinging to the overturned craft, but as of today the Coast Guard search has been called off for the other three. The rescued boater spent nearly two days with the craft before rescue. Even with poor weather, the search could likely have started many hours earlier had a PLB alert been triggered.

ACR MicrOFix, just like I carryNext comes the story of two off-piste snowboarders in the Alps. Once again, one of the party survived, this time by using a GPS-equipped iPhone and what seems to be a lucky strike with a WiFi signal from a nearby resort. His friend died, though that may have been the result of a fall. In either case, a PLB might have sped up rescue operations for one or both of them. This is also a good reminder that the COSPAS/SARSAT network is a GLOBAL cooperative effort. In this case, the same satellite constellation would have been notified, but rather than US Coast Guard, or Park Rangers, or the RCMP, the appropriate Swiss authorities would have been notified.

Seriously people, if you're going to be spending any amount of time away from the comfort of your urban/suburban environment, take one minute to think about how much you'd spend to be able to call for rescue in an emergency. How much would you pay to call 911 if you were trapped in a burning building? Lost at sea or stuck in a blizzard is just as serious and just as deadly. Why wouldn't you spend a little money to make sure you could call for help?

Read More...

Thursday, February 26, 2009

One skier dead, one finally rescued after 10 days

According to a couple of stories from CBC News and GlobeandMail.com, a Woman has died after she and her husband got lost while skiing and spent 10 days in the B.C. wilderness.

The tragedy of this story is massive. I won't recount all of the details (see the above articles for that), but it seems that critical failures of preparation were made by the skiers, and critical failures of response were made by the local volunteer S&R team and the RCMP.

Sadly, any one of these missed steps by the skiers might have changed the outcome:
  • They didn't let anyone know to expect their return that day. No ground search was launched until they were actually reported missing nine days after getting lost.
  • The couple had no survival gear, just two granola bars and no water. Even a basic PSK (Pocket/Personal Survival Kit) would have provided for fire, and thus melted snow for water. An improvised shelter of even basic materials like a couple of garbage bags or a mylar space blanket would have reduced their exposure significantly also, reducing the need for additional calories to keep warm.
  • No GPS or Map & Compass. Getting lost is best avoided by "staying found", but even someone who is massively lost could likely have found a path back to safety given a little time, and assuming they knew how to use those tools.
  • No Personal Locator Beacon. A $450 PLB would definitely have alerted the highest eschelons of both American and Canadian SARSAT command and would certainly have kicked off the search nine days sooner, no matter what mistakes were made at the local government level.
As for the local volunteer S&R and RCMP organizations, I'm sure they will be looking long and hard at their own response procedures to determine why multiple SOS signals were ignored. The actions taken by the Golden & District Search and Rescue may even qualify as criminally negligent, and their response to the RCMP inquiries certainly hampered the RCMP response.

< Soapbox Mode > Its obvious that mistakes were made all around, but the skier's failure to prepare was the set that might have had the biggest direct impact.

Please please please, if you ever spend ANY amount of time in the outdoors, even as "civilized" as a ski or beach resort, consider your surroundings and circumstances and prepare for these kinds of events. And while you're preparing your few essential survival elements, please consider investing in a 406MHz PLB. I'm sure Ms. Fortin's family would agree that $450 is a small price in exchange for a life saved. If you have any doubt, let me point you to this other timely article: NOAA Satellites Helped Rescue 283 People in 2008

< / Soapbox Mode >

Read More...

Sunday, April 20, 2008

Low Budget Wine Cellar from Refrigerator

'Round my house, we love wine. A lot.

At one point we had so much wine in the house that in order to keep track, I wrote an Access database program I dubbed "Wine Collector" (in homage to my favorite DVD database product Movie Collector).

We aren't really snobs, we'll drink a big range of stuff, but some of the wine we have is pretty good, and we'd like to keep it that way. Unfortunately, commercial wine cellars (aka "wine coolers" or "wine fridges") are pretty expensive, especially if they hold any reasonable amount of wine. The smaller units are typically underpowered vanity items that only store one or two dozen bottles, and usually don't do it very efficiently. There are some exceptions of course, high quality under-counter jobbies made by reputable companies with quality refrigeration hardware, but these are nearly as expensive as the larger models of any measurable quality.

So what to do? Well, for us we did what a lot of people do, which is that we put our wine at risk. We stored it in the house, at room temperature and uncontrolled humidity. Where possible, we squirreled cases away in the tops of closets, etc., but generally, it was somewhere in the house. I don't even want to think about what this may have done to something like a 2001 El Molino Pinot Noir.

Then, I stumbled across some wine collector websites where some people had been converting old fridges to wine cellars. Either by hacking the existing thermostat, or using some sort of external controller, the unit can be setup to hold a temperature more appropriate for wine (about 54° for mixed reds/whites).

Luckily, I already had an unused fridge to start with. When we moved to our new home, we brought along our old refrigerator. The buyer of the old house didn't want it, and my wife really wanted to keep it because she liked the bottom-freezer layout. After arriving, however, we figured out that the proximity of the kitchen cabinets opposite the fridge location meant that we'd be limited to side-by-side configurations, because the sweep of the doors would interfere with the cabinet. Bummer. So that fridge sat in the garage, waiting for me to clean it up and sell it or convert it to the "beer fridge". Well, now it had a more noble (and wife approved) mission ahead of it: Wine Cellar.
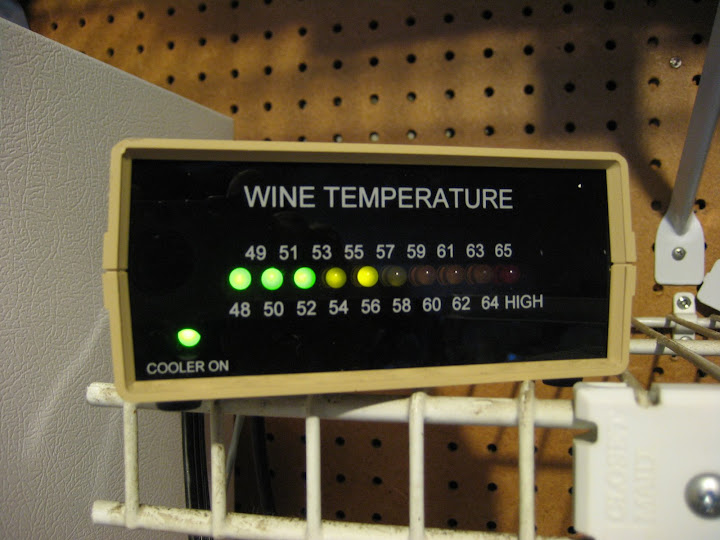
With some poking around looking for an appropriate thermostat unit, I stumbled across and older model WineStat unit on eBay, and it was mine for an uncontested $10 bid. I'm not sure how much this model was originally, but the new digital display models are $170, so I think I did ok!

After cleaning up and sterilizing the inside of the fridge (it sat for almost two years!), all I needed to complete the transformation was a way to store wine inside.

The WineStat webpage has some interesting ideas about low-cost wine racking solutions, but I chose to go with the very reconfigurable "Tinker-Toy" style racks from J.K. Adams. As it happened, Crate and Barrel had these in their outlet store as "irregulars" for $19.95 for each 12-bottle kit. In this case, "irregular" meant inconsistent woodgrain color, which I was completely fine with. A "12-bottle" kit really means you get 16 "beams" and a whole pile of pins to configure however you please. With four of these kits (less one leftover beam and a few pins) I was able to build a solid 48 bottle unit that fit perfectly with room for air to circulate.
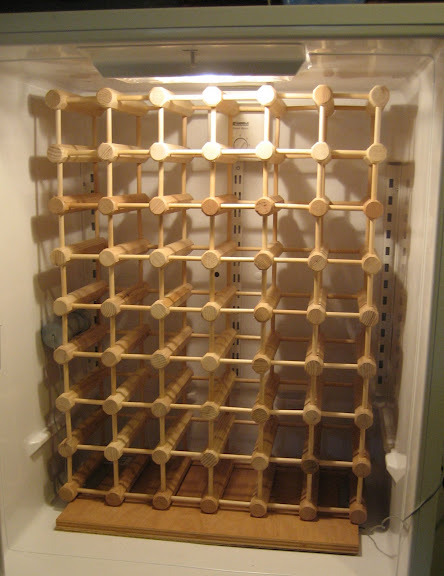
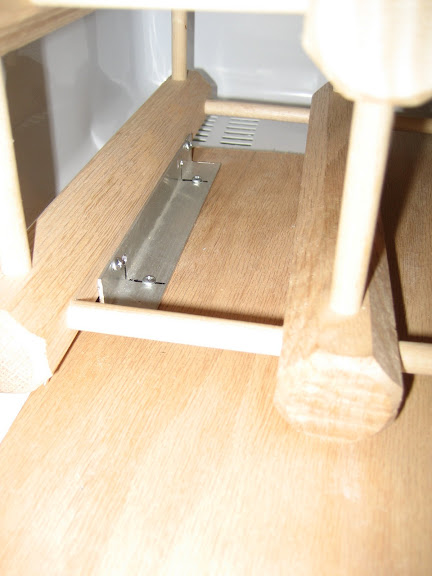
The wooden platform underneath was a leftover bit of oak cabinetry ply that flattens out the floor of the fridge box so the rack sits level. I had to cut a notch in the back left corner to clear the raised vent where cool air flows from the freezer to the fridge. A couple of quick mounting brackets made from aluminum keeps everything locked down and stable:
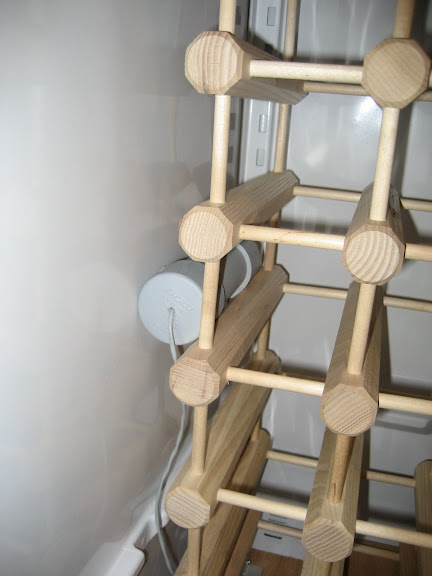
Then its just a matter of inserting the probe into the rack and plugging everything in. The probe should be centered in the box, its off to the side here while I finalized installation.

Most people don't realize that modern refrigerators depend on the thermal mass inside to help regulate the temperature. I tested the setup with several gallons of water in containers in the fridge and freezer boxes first. Once I was confident it would hold temperature, in went the wine rack, and shortly after, the wine!
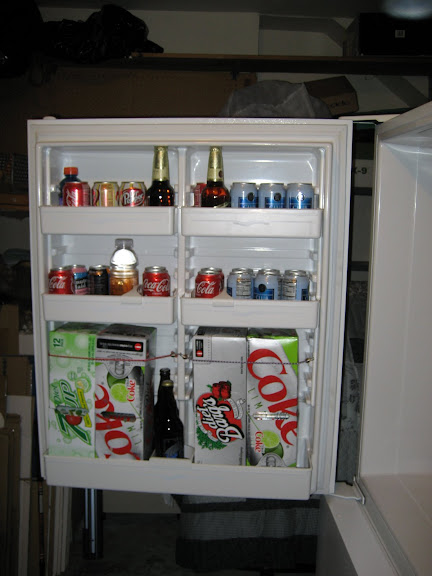
Agitation is bad for wine, so I resisted the urge to pack in more bottles using the spaces in the door. Instead, I filled this area with the soda, beer, and other beverages that would have otherwise been stored in the pantry. Its not ice-cold refreshing, but its pre-chilled which saves work for the in-house fridge when items are transferred there for consumption.

Your fridge may vary, but during my bottles-of-water testing I found that in order to keep the fridge box at a wine-friendly 55°, the freezer box ended up cycling around 30-32°. This is below freezing, but not in a zone that I feel is safe for frozen food storage.

In order to turn this into a win-win-win situation, I'm keeping the freezer box filled with gallon bottles of commercial drinking water in PET containers (with room made for freezing expansion). This constitutes part of my backup water supply in case of emergency (my wife lived through the Northridge quake and we've been on evacuation notice for wildfires here twice in the last 4 years). Having additional ice on hand will also allow me to transfer to the in-house freezer to keep frozen food safe longer if we lose power during an emergency. Lastly, the frozen mass of water helps stabilize the box temperature as the thermostat controller goes through its hysteresis, which also lets the box stay "off" longer, using less power.

The only issue left to be resolved is humidity. 60-70% would be best for keeping the corks happy, but food fridges are usually pretty dry. For now I'll probably keep a small tin of water in the box, but I plan on investigating the humidifier units people use for large cigar humidors.

All up, I've expended less than a $100 cash and a few hours time to clean up the old fridge, assemble the tinker toys, and mount and test the system. More pictures with detail photos of some items are available in the album: Low-Budget Wine Cellar.

(04/21/08)UPDATE: I've added new photos to the album. You can see that our cellar is already full. Time to have a party! Read More...

Saturday, February 17, 2007

WBC Sidebar: LNT and Ultralight Backpacking

A couple of friends who know I'm an ex-boyscout and generally sort-of-experienced person have asked why I'm taking a course like the WBC. My answer is that after 15 years off from serious backpacking, a lot of things have changed. Gear is lighter and better, and the philosophy behind the "low impact" techniques I learned in Scouting have morphed into the "Leave No Trace" philosophy. The biggest change I can point to is that its now common practice to pack out used TP, whereas it used to be buried. On our Snow Camp trip, where the potential impact is much higher due to large numbers of students in a relatively small area, we'll even be packing out our human waste.

Another big innovation is the philosophy of "Ultralight Backpacking". In the old days 35, 40, or 50+ lbs was a normal packload for even a short trip. Using the old "25% rule", someone my size would expect a load of 50lbs. However, advancements in gear technology and a commitment by some to "do more with less" has brought about a revolution to drive down the weight of packs. Some ultralighters have a base pack weight (gear minus food, water, and fuel) down below 10 lbs! There are some interesting synergies, like a reduced pack weight lets you use lighter boots (or even trail runners) rather than the heavy 3/4-shank all-leather monsters I grew up with. This amplifies the effect of a lighter pack, allowing easier (or more) miles underfoot.

One of the things I've been experimenting with since first learning about Ultralight backpacking, is Alcohol stoves. In particular, super-lightweight stoves made from aluminum cans. The advantages are obvious upon inspection: The stoves are simple (no moving parts), compact (made from cut-down beer cans), and weigh a fraction of the weight of even the lightweight backpacking stoves of commercial manufacture. Compared to my old MSR Whisperlite, the difference is amazing.


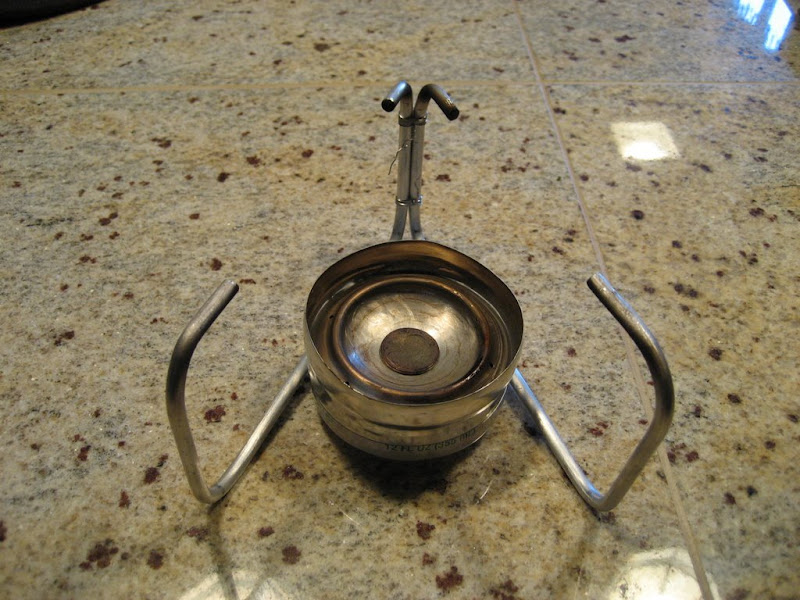
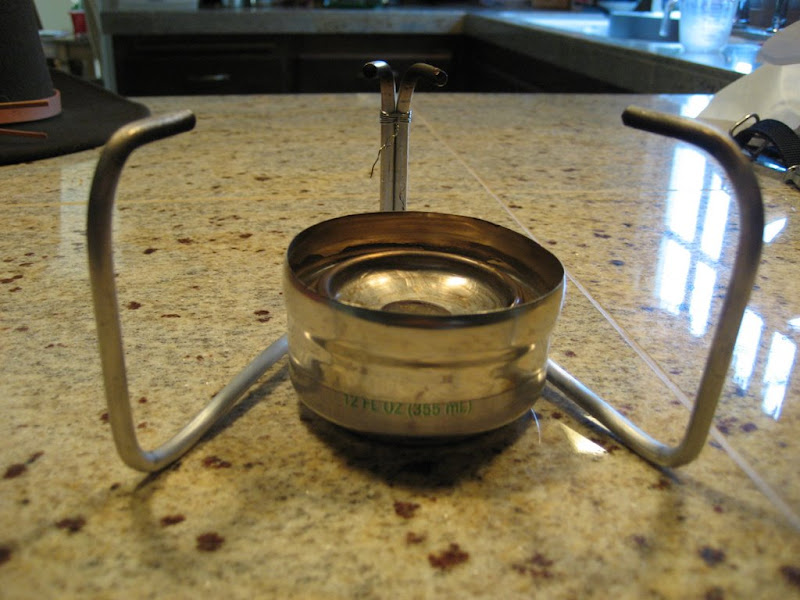
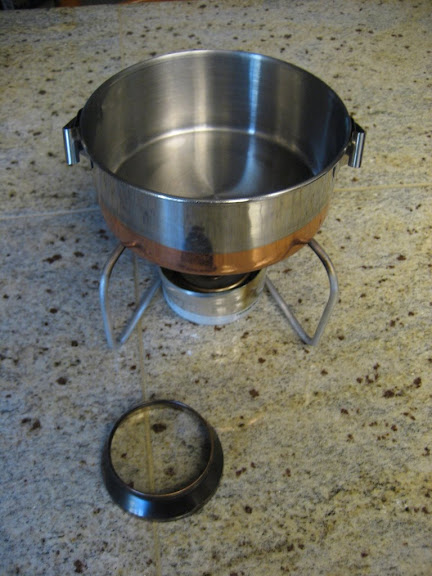
I used Mark Jurey's Penny Stove example when creating my first stove. I'm sure I'll try another at some point, but for now I'm really happy with the results. This particular stove uses a pair of the Heineken "Keg Cans" for the burner and fuel cups, and a soda can (diet 7-up for those keeping score) for the base/lid. And of course, the namesake penny as the regulator. The stove actually develops a small amount of pressure as the denatured alcohol fuel is vaporized in the cup. The weight of the penny over the central holes is enough to keep the pressure at a good level but allow venting (and an extra central jet) when the pressure gets too high. A "simmer ring" (see bottom of picture below) redirects the jets and slows the evaporation of the fuel, allowing a longer/cooler burn time for simmering food. The design genius in its simplicity. I had some trouble with sealing the construction of mine so I went ahead and "caulked" the cups together with JB weld, but most folks get a pressure-tight fit from interference alone. Impressive!

I've also upgraded to a 1.3L Snow Peak titanium cookpot to replace the old stainless pot seen here. Its lighter, despite the greater capacity, and should be a bit more efficient too since its black rather than the reflective exterior. The important metric of this experiment is the weight of the whole cooking "system", as there's more to consider than just the stove. The one disadvantage to alcohol over white gas or pressurized liquid fuel canisters is that alcohol burns at a lower temperature and has a lower overall energy density, meaning that you have to carry more fuel per meal. On the other hand, the denatured alcohol fuel can be carried in a lightweight plastic water bottle or other such vessel (I use a flat-square soap bottle that fits my cookpot well), while white gas has to be carried in a spun aluminum bottle with a gasket and pressurized fuels have their own disposable metal canisters. The massive weight savings of the stove itself, along with the fuel bottles and ancillary bits means that I'd have to be going on a pretty long trip (5+ days?) before the fuel weight difference would overtake and make a white gas stove a lighter alternative.

One of the things I was using the Car-Camp outing for was to try some new gear and new techniques. It was a good chance to try some stuff without having a failure be totally catastrophic. A new lunch system was tried with great success, and I had mixed feelings about the new sleeping bag and tent I'd rented from REI. All of these experiences get fed-back into my gear for the next outing. I'll use the next outing to evaluate my new cooking system in the same way, although backyard tests have shown that the time-to-boil for two cups of water is only about a minute longer than with white gas. Read More...

Friday, January 12, 2007

Gettin' Outside

Long ago I was a Boy Scout. My close friends know this, not because I speak often of my time in the scouts, but because parts of the social conditioning they imprinted on me stuck so successfully. Like it or not, the "Be Prepared" ethos is carved onto my soul, and while I sometimes don't work hard enough at being obedient, thrifty, or reverent, most of the other conditioning has stuck too. Its amazing to me that an organization that I feel so conflicted about (and ultimately felt compelled to leave, over organizational politics), had such a strong impact on me that in most things would probably be considered positive.

Well, BSA Motto, Law, and Slogan aside, my time in the scouts left me with one other itch I haven't scratched in quite a while, and that's a love of the outdoors. Between family trips and scouting, I spent a good chunk of my youth outdoors. That practice ended unexpectedly suddenly with college, when time and sleep became precious commodities. I've dragged my wife out on a few outings since then, and even done a couple of (perhaps ill-advised) solo trips.

I like the freedom of a solo hike, but that "Be Prepared" mantra as well as a healthy respect for Murphy and Mother Nature make me a bit anxious when off by myself. So while searching Craigslist for a hiking partner, I found instead the Sierra Club Wilderness Basics Course. I'm pretty excited, as the course consists of weekly classes and biweekly outings including hiking, car camping, backpacking, and snow camping.

Now I'm sure the weekly lectures will be largely review, but then again I can use the review. I'm also hoping that at the end of the course I've gained either some new potential hiking partners, or at least the confidence and knowledge to tackle additional solo trips with less risk.

In any case, I'm sure I'll be commenting on this experience more, and offering my review as it unfolds, but for anyone looking for a way to get outdoors that provides some structure and oversight, this looks like a great way to get it! (My class starts January 18, so sign up and join me if you can!) Read More...

Friday, July 29, 2005

What's in your bag?

What's in your bag today?

I got reminded of the Flickr What's in your bag? tag project-thing today while reading Zen Pockets on my lunch break. It inspired me to check my current loadout, and see where I could make improvements.

So here it is, albeit without the fancy box-highlighted images from Flickr, more or less Left-to-Right and Top-to-Bottom:

  1. The Bag: My ancient Jansport bar-top messenger that I've had since my 2nd year of college. This thing has hauled everything from school books to hammers and raw steel. In fact, it looks like its sort of on its last legs. Its back in service because my daily collection of stuff was becoming too much for "on my person" carry, especially in the warmer summer months (shorts), and especially when I'm switching cars all the time. (I drive the Miata a lot more in the summer).
  2. Business cards, or at least last month's iteration thereof. We did a reorg again this month, need to check if everything is still correct...
  3. Loose change, for the odd parking meter or vending machine.
  4. Leatherman Squirt S4, my current favorite micro-multitool. I've got a whole mess of these things with various tools, this seems to be the current best mix. I carry it just about everywhere (except airports) because it sees almost daily use. It has a plunger quick-disconnect to:
  5. Keys #1: House, mailbox, office, etc. type keys. These go almost everywhere too, mostly because I like to be able to get into my house and stuff... :) Not to be confused with:
  6. Key(s) #2: The key(s) and whatever transmitters might be needed for whatever car I'm driving that day. Today its the Miata. These go in the other pocket when I'm bagless...
  7. Writing instruments: Usually some mix of fine and ultra-fine uniballs in black and blue, a 0.7mm mechanical pencil, and a new addition: a fine "sharpie". Added recently for marking silver coins prior to annealing for my stone setting class.
  8. Altoid's Tin turned iPod case: I trimmed the vacuum-formed plastic insert from the original Shuffle packaging to fit into a tin. It holds the player and earbuds in geek-chic luxury while protecting everything and keeping it clean.
  9. A stack of UCSD Evening parking permits. It was a major revelation when I figured out I could buy these things in bulk. For some reason it never occurred to me and I was buying them one-at-a-time for years.
  10. Standard Black "Comp Book", grid ruled. Mostly used for sketching pieces and planning work for my metalsmithing, but occasionally I take notes in it too.
  11. Letter-size accordion file. This holds the comp book and all the loose papers I seem to collect, like a list of local suppliers for my metalsmithing classes or a list of instructions from the Judge at jury duty. It also serves to add a little rigidity to my aging nylon bag, so the heavy stuff at the bottom doesn't make it sag when I don't have a book or my laptop with me...
  12. One 12" cable tie. Who knows, I must have thought I needed it.
  13. Semi-hard case for my Sunglasses, clipped to the bag's shoulder strap. Picked up a set of Maui Jim glasses on Oahu last month, its the first set of "nice" sunglasses I've owned in quite a while. We'll see how long they last.
  14. Motorola V600 Cameraphone (not shown) - I used to think cameraphones were silly, at least until I got one. I use it all the time now. Mostly I use the camera instead of taking notes. I'll photograph a price tag or store display to get a crucial model number or the physical dimensions of a piece of furniture. Also comes in handy for remembering the vintage of that great bottle of wine we had at dinner... I've always used my cellphone as a PIM, and that functionality keeps getting better, to the point that I just can't justify carrying a PDA. I just wouldn't use it. I've seen a Blackberry or two I could probably trade for my phone, but not many. The phone usually lives in the bag now, but I used it to photograph this whole mess, hence the less-than-ideal image quality. I didn't say it was a great camera.
  15. My Wallet of Doom (not shown) - This is the one thing I really need to work on. I've gone on several pocket diets, but I just can't seem to keep the weight off. My keyrings are now wonderfully spartan, but I haven't managed to shed all the club cards, discount cards, etc. that make a wallet so fat. Maybe I'll find a way to take a page from the Zen Pockets article and move some of that stuff off to a sub-wallet I can throw in my bag...


So, what's in your bag today? Next trick is to tackle Kim's bag, maybe we can shave 3 or 4 pounds out of it... Read More...